
Brown Butter Ganache
Rich, nutty brown butter meets sweet, melt-in-your-mouth milk chocolate. Sweet, rich, and slightly nutty.
This post may contain affiliate links. Read our privacy policy.
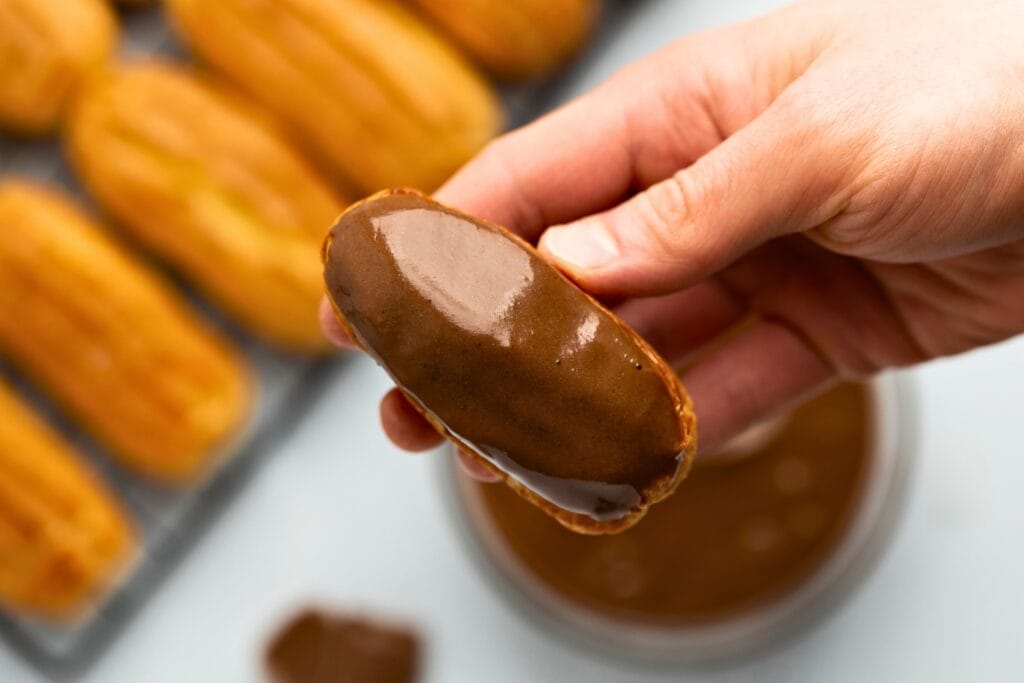
This brown butter ganache delivers a nutty, caramel vibe without any fuss. It’s soft, spreadable, and totally beginner-friendly—perfect for drizzling on cakes, dipping eclairs, or filling macarons. Or anything else, really.
Recipe Info
This recipe is:
- Soft and spreadable. Thanks to a generous amount of butter (needed to make it a proper brown butter ganache), the ganache stays soft and spreadable at room temperature even if you let it set for a long time.
- Easy to master. Brown butter might sound fancy, but it’s just butter cooked until golden and fragrant. After that, the ganache comes together quickly.
- Great for desserts. Whether you need a filling, a glaze, or a dip, this ganache adds a rich, nutty taste to cakes, cookies, pastries—pretty much any sweet treat.
Making brown butter ganache for the first time? Read the ingredients notes, step-by-step instructions, and tips. If you’re familiar with the recipe, feel free to jump to the recipe card.
Ingredients and Substitutes

- Milk chocolate. A decent-quality milk chocolate is all you need. Melting chocolate (callets) also works well.
- Heavy cream. I use regular 30% fat heavy cream, but a 36% version is fine if you want a slightly firmer ganache.
- Butter. Regular ol’ butter. I use unsalted and add salt to taste.
- Salt. A pinch or two can enhance the overall flavor and balance the sweetness. Skip it if you’re using salted butter.
- Honey. Adds a bit of extra sweetness and helps keep the ganache smooth.
Step-by-Step: How to Make Brown Butter Ganache
Step 1: Make Brown Butter
(Never made brown butter before? Check out my brown butter tutorial.)
- Melt the butter. Cut the butter into cubes, place it in a saucepan, and set it over medium heat. Stir occasionally as it melts.


- Listen for the sizzle. As it heats up, the butter will start to sizzle around the edges, and there will be a gentle sizzling sound. Keep stirring occasionally, especially if it starts to foam.

- Crackling begins. The sizzling will turn into a crackling sound—tiny, sharp pops instead of a continuous sizzle. Keep stirring. You’re on the right track.
- Crackling fades. That pleasant crackling sound you got used to? It will slowly die down, and things will get quiet. You’re almost there.

- Check the aroma. Start watching closely, stirring as needed. You’re looking for a nutty smell and brown specks forming on the bottom of the pan. There will likely be a lot of foam at this point, so use a spoon to check underneath. If it smells rich and nutty and you see brown specks, it’s done.


- Brown butter is ready. Take it off the heat. It’s now ready to use.
- (Optional) Strain the butter. If you prefer a smoother texture, pour the brown butter through a fine-mesh sieve to remove the toasted milk solids. I pretty much never do that – those toasted specs are where the flavor is.
Step 2: Make Ganache
(Ready my ganache 101 if you’re new to making ganache.)
- Prep chocolate. Chop the milk chocolate.

- Warm the cream. Heat the heavy cream on the stove until it’s hot but not boiling—small bubbles form around the edges and pop back up after stirring. Stir in the hot brown butter (including all the dark bits) and continue cooking until it bubbles. Take it off the heat.


- Combine with chocolate. Add the chopped chocolate to the pot and let it sit for a minute. Stir until it’s fully melted. If any bits refuse to melt, return the pot to low heat and stir continuously until everything is smooth.
- (Optional) Blend. For an ultra-smooth texture, use an immersion blender for about 10–20 seconds. Keep the blade below the surface to avoid whipping in air.


- Add honey and salt. Add the honey and salt (if using unsalted butter). Taste and add more salt if needed.
- Cool. Let the ganache rest at room temperature, stirring now and then, until it’s the consistency you want—pourable for glazing or firmer if you need more control. To speed things up, set the pot in cold water and stir.


- Refrigerate or use. Once it’s how you like it, use it right away or pop it in the fridge for later.

Tips
- Soften in a warm water bath. While this ganache stays fairly soft at room temperature because of the butter, it does firm up in the fridge. To soften, fill a large bowl with warm tap water and set the container of ganache in it. Stir as soon as the bottom and sides begin to melt, and keep going until it’s as soft as you need.

- Blend if it separates. If you leave it in a warm water bath a bit too long, you might come back to a puddle of melted butter on top. That’s separation. Usually you can whisk it back together, but an immersion blender is even better. A few seconds, and your ganache should be nice and smooth.
Storage
You can store this ganache sealed tightly in the fridge for 3 to 4 days. Warm it up before using.

Similar Recipes to Try
Looking for more? Check out the following recipes:
- Peanut butter ganache. Another sweet and nutty ganache, this time made of white chocolate and peanut butter.
- Earl Grey ganache. If you’re into tea-flavored desserts, you’ll love this white chocolate ganache infused with Earl Grey tea.

Equipment
Ingredients
- 4.5 oz milk chocolate ~127g
- 1/3 cups heavy cream 80g
- 2 tsp honey ~15g
- 4 tbsp butter ~57g
- 1/8 tsp salt more to taste, skip if using salted butter
Instructions
Make Brown Butter:
- Melt the butter. Cube the butter and melt it in a saucepan over medium heat, stirring occasionally.4 tbsp butter
- Listen for the sizzle. As it heats, the butter will sizzle around the edges. Keep stirring occasionally, especially if it foams.
- Crackling stage. The sizzle will turn into a sharper crackling sound. Keep going (and stirring regularly).
- Quiet phase. The crackling will fade and things will turn quiet. You're close.
- Check for browning. Stir and look for lots of brown specks at the bottom. A rich, nutty aroma means it’s ready.
- Remove from heat. Once browned, take it off the heat.
- (Optional) Strain the butter. If you prefer a smoother texture, pour the brown butter through a fine-mesh sieve. I typically skip this step.
Make Ganache:
- Prep Chocolate. Chop the milk chocolate.4.5 oz milk chocolate
- Warm Cream. Heat the heavy cream until just below boiling (small bubbles at the edges). Stir in the hot brown butter (including the dark bits) and cook until it bubbles. Remove from heat.1/3 cups heavy cream
- Combine with Chocolate. Add the chopped chocolate and let it rest for a minute. Stir until fully melted. If needed, return the pot to low heat and stir until everything melts.
- (Optional) Blend. For a super-smooth texture, blend with an immersion blender for 10–20 seconds, keeping the blade below the surface to avoid air bubbles.
- Add Honey & Salt. Stir in honey and salt (omit if you used salted butter). Taste and adjust salt if needed.2 tsp honey, 1/8 tsp salt
- Cool. Let the ganache sit at room temperature, stirring occasionally, until it reaches the consistency you prefer. To cool faster, set the pot in cold water and stir.
- Refrigerate or Use. When it’s at the desired consistency, use immediately or transfer to the fridge for later.