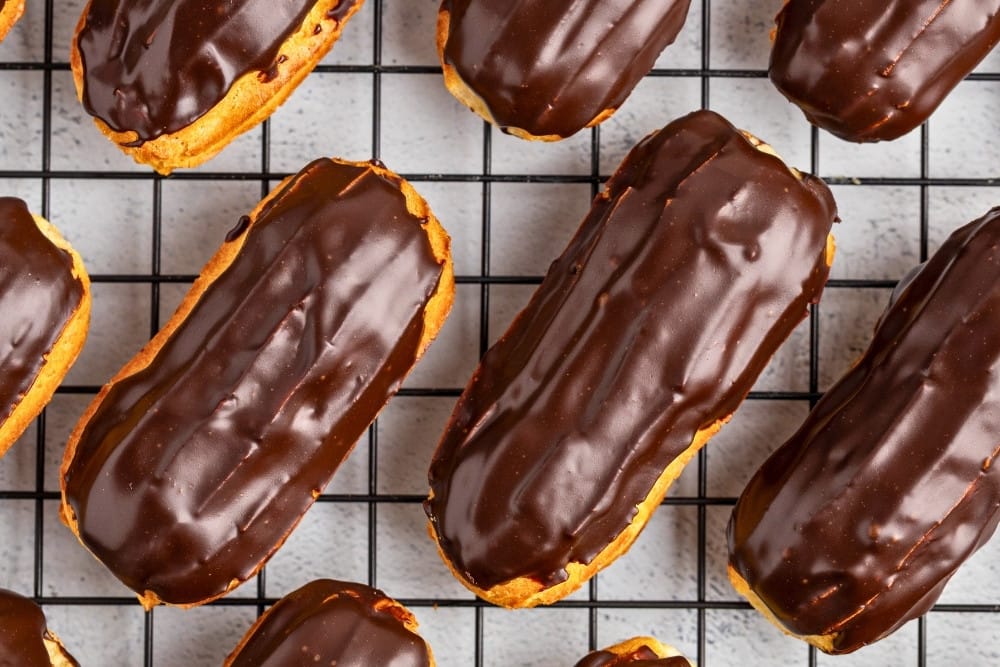
Chocolate Eclairs Recipe: A Step-by-Step Guide for Beginners
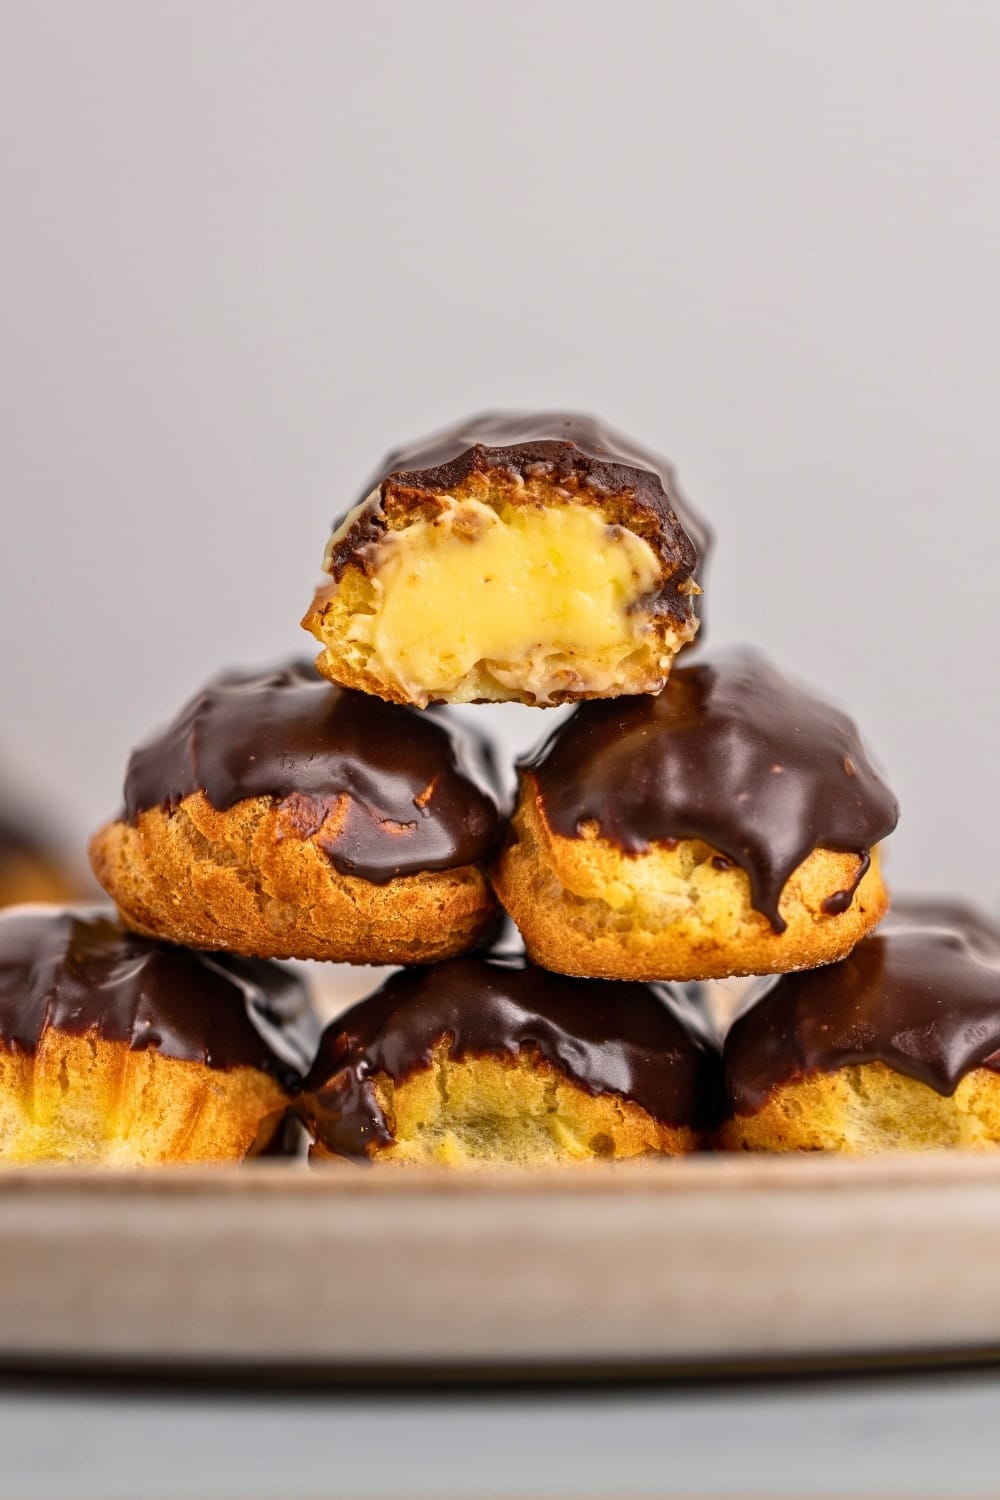
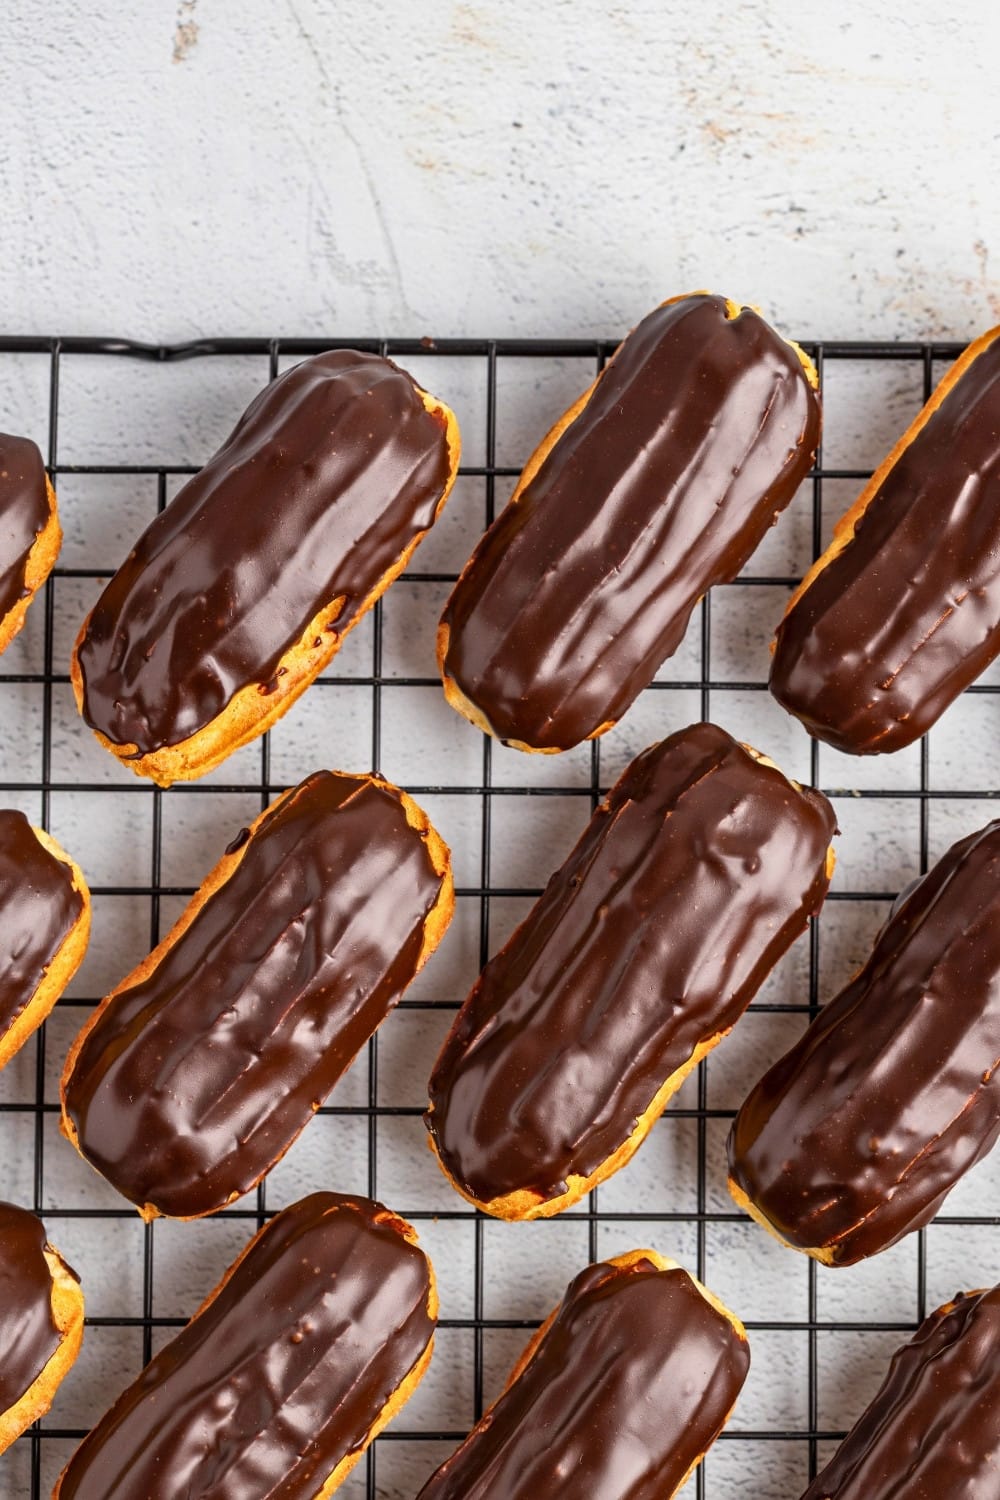
Crisp choux shells filled with silky vanilla cream and topped with dark chocolate ganache.
This classic chocolate eclairs recipe walks you through every component from scratch — choux pastry shells, a silky vanilla pastry cream filling, and a glossy dark chocolate ganache on top. It’s a proper French dessert, and yes, it’s worth the effort.
The recipe is broken into three parts, each straightforward on its own. The pastry cream needs time to chill, so you’ll make it first — you can do it the day before. The choux pastry comes together quickly on the stovetop, and the ganache takes about five minutes.
If you’re exploring eclair flavors beyond the classic, this is the foundation to know. The choux pastry shell works with any filling, and the ganache can be swapped for milk or white chocolate just as easily.

Why You’ll Love This Recipe
- Classic French flavors. Crisp choux pastry, silky vanilla cream, and dark chocolate ganache — this is the éclair as it’s meant to be.
- Versatile base. The choux shell and ganache work with any filling. Once you know this recipe, you can riff on eclair flavors endlessly.
- Great for sharing. The recipe makes 16 mini éclairs — enough for a crowd, and easy to scale up.
Ingredients Notes and Substitutes
Choux Pastry
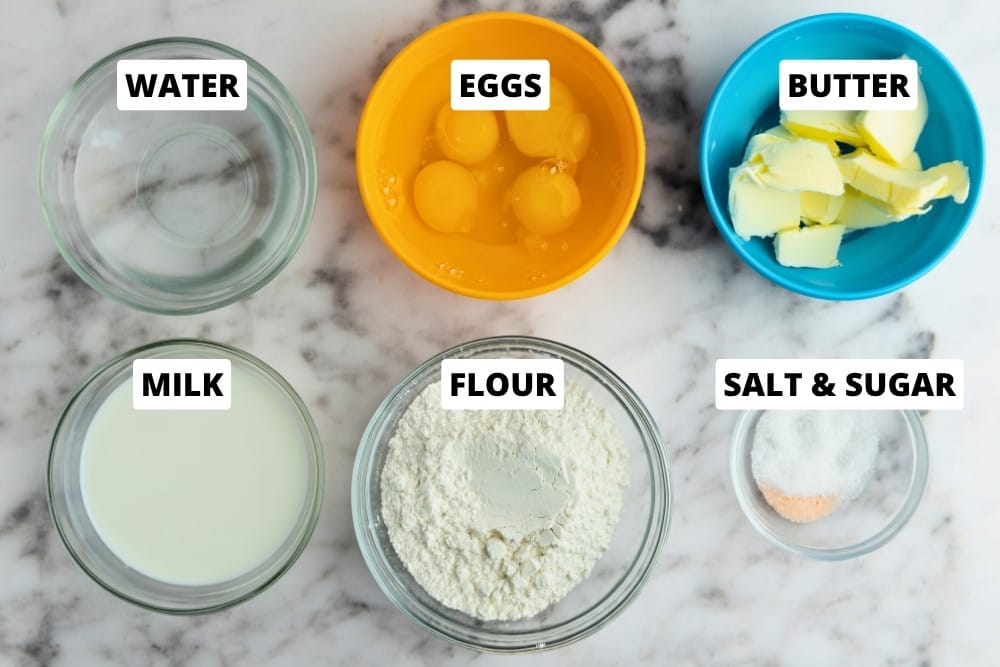
- Water and milk. Together they form the liquid base of the choux dough. The milk adds a bit of fat and sugar, which helps with browning.
- Unsalted butter. Adds richness and helps create steam in the oven, which puffs the shells. Use unsalted so you control the salt level.
- Flour. The structure of the dough. White bread flour is the best option here — its higher protein content makes a stronger dough with fewer cracks. Regular all-purpose flour is a close second and works well too.
- Salt and sugar. Small amounts, but both matter — salt sharpens flavor, sugar aids browning.
- Eggs. Give the dough its final consistency and drive the puff in the oven. Add them gradually — the exact amount matters for getting the right texture.
- Powdered sugar. Dusted on top before baking. Helps the surface caramelize evenly and reduces cracking.
Vanilla Pastry Cream
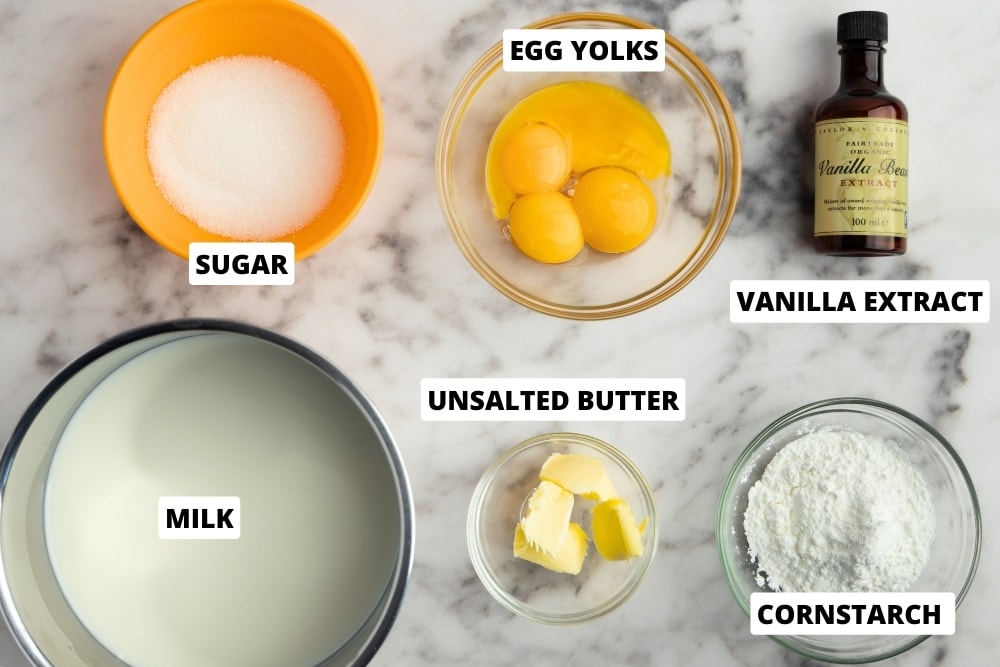
- Milk. The liquid base of the cream. Whole milk gives the richest result — lower-fat milk works but produces a slightly thinner cream.
- Egg yolks. Add richness and help the cream set.
- Cornstarch. The thickener.
- Sugar. Sweetens and stabilizes. You can adjust slightly to taste after cooking.
- Vanilla extract. The primary flavor. Use a good-quality extract or swap vanilla bean paste.
- Unsalted butter. Stirred in off the heat for a silkier, richer finish.
Dark Chocolate Ganache
- Heavy cream. Melts the chocolate and creates the emulsion.
- Dark chocolate. The base of the ganache. Use good-quality chocolate — the flavor carries directly into the final result.
- Unsalted butter (optional). Adds extra gloss and richness. Skip it if you want a simpler ganache — the result is still good.
Step-by-Step: How to Make Chocolate Eclairs
Vanilla Pastry Cream
👉 Read our vanilla pastry cream recipe for extra tips and details.
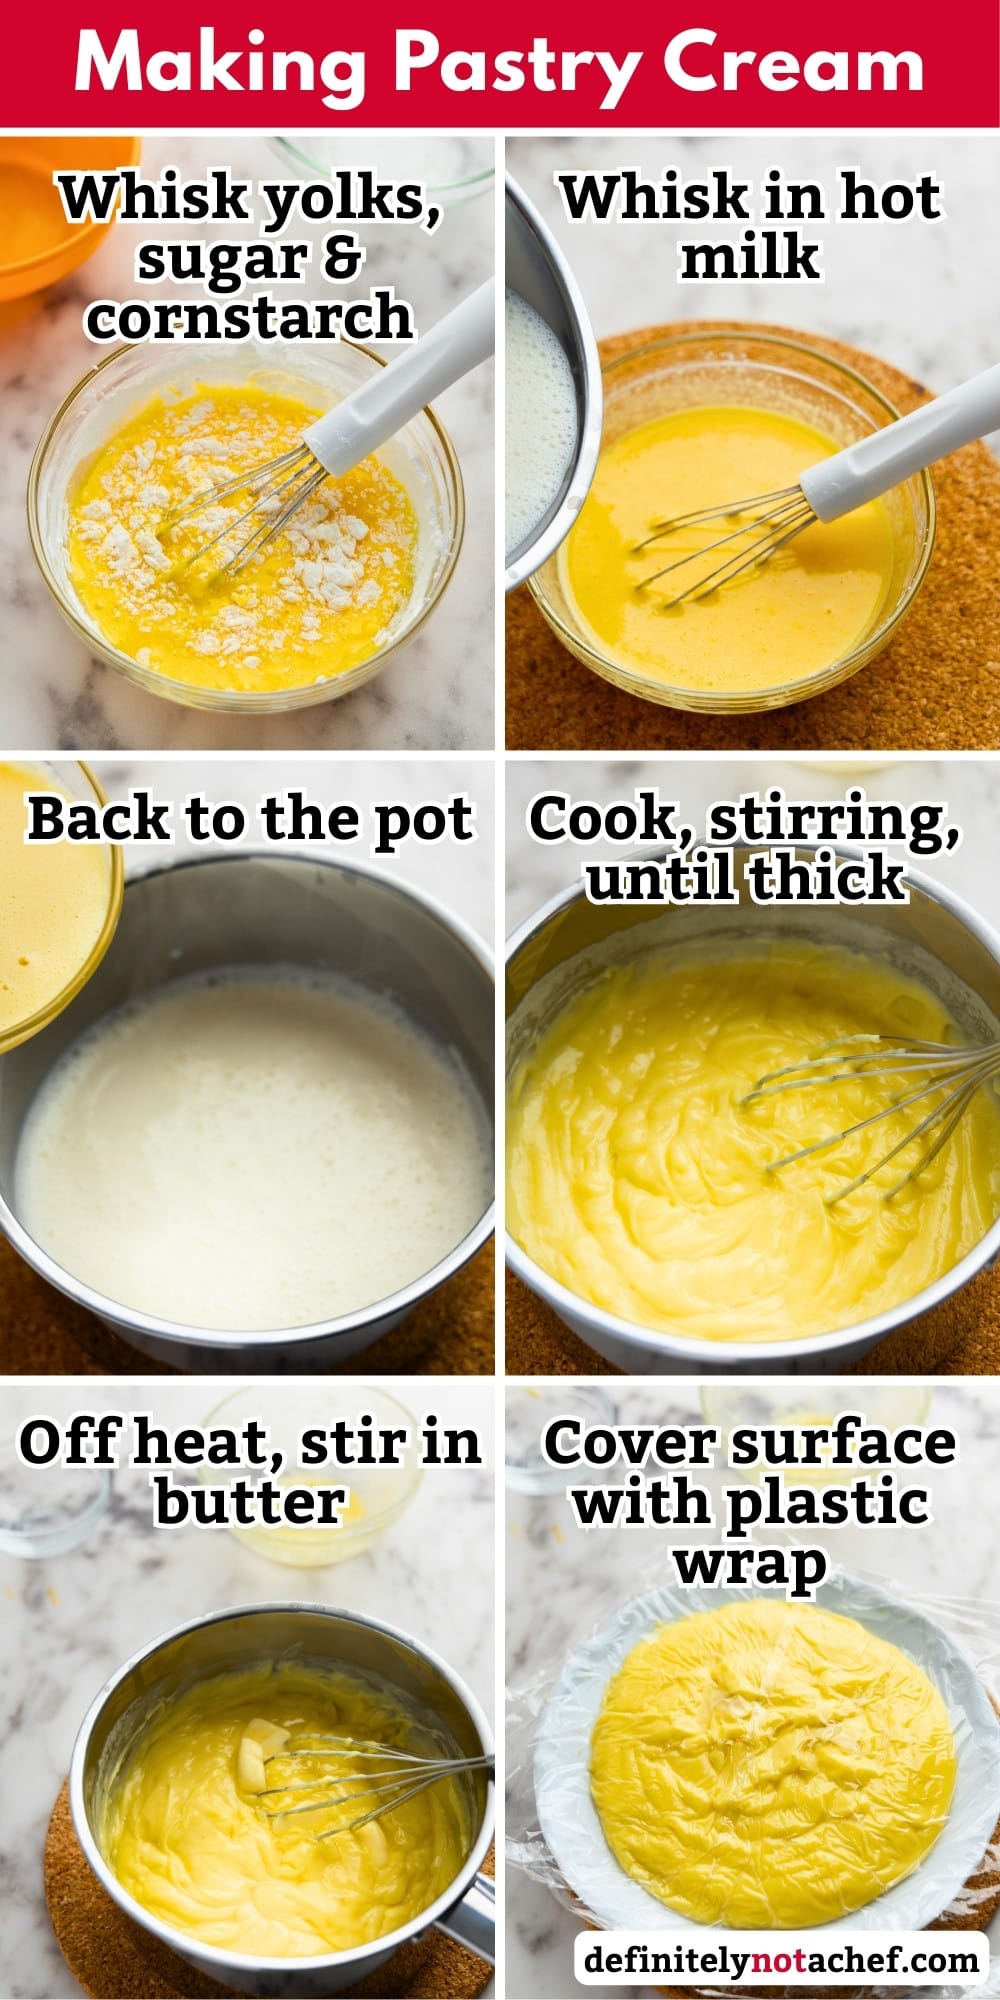
- Boil the milk. Combine the milk, vanilla extract, and half the sugar in a saucepan. Heat over medium until steaming and just about to simmer — don’t let it boil.
- Prep the yolks. While the milk heats, whisk the egg yolks, cornstarch, remaining sugar, and 2 tablespoons of the warm milk together in a bowl until smooth.
- Temper the eggs. Gradually ladle the hot milk into the yolk mixture a few tablespoons at a time, whisking constantly. Keep going until all the milk is incorporated.
- Thicken the cream. Pour the mixture back into the saucepan and cook over medium heat, whisking constantly, until it thickens and starts to bubble. Once bubbling, keep whisking on low heat for another 30–60 seconds.
- Whisk off the heat. Remove from heat and whisk for another 30–60 seconds to slightly loosen the texture.
- Add the butter. Stir in the butter until fully melted and incorporated.
- Taste and adjust. Add more sugar or vanilla if needed.
- Chill. Press plastic wrap directly onto the surface of the cream to prevent a skin from forming. Cool at room temperature for 30 minutes, then refrigerate until needed.
Choux Pastry
- Preheat the oven. Heat to 390°F (200°C).
- Combine and boil. Add the butter, milk, water, salt, and sugar to a saucepan and bring to a boil, making sure the butter is fully melted before it boils.
- Add the flour. Remove from heat and tip in all the flour at once. Stir vigorously to combine, then return to low heat and stir for 2–3 minutes until the dough is smooth and a thin film forms on the bottom of the pan.
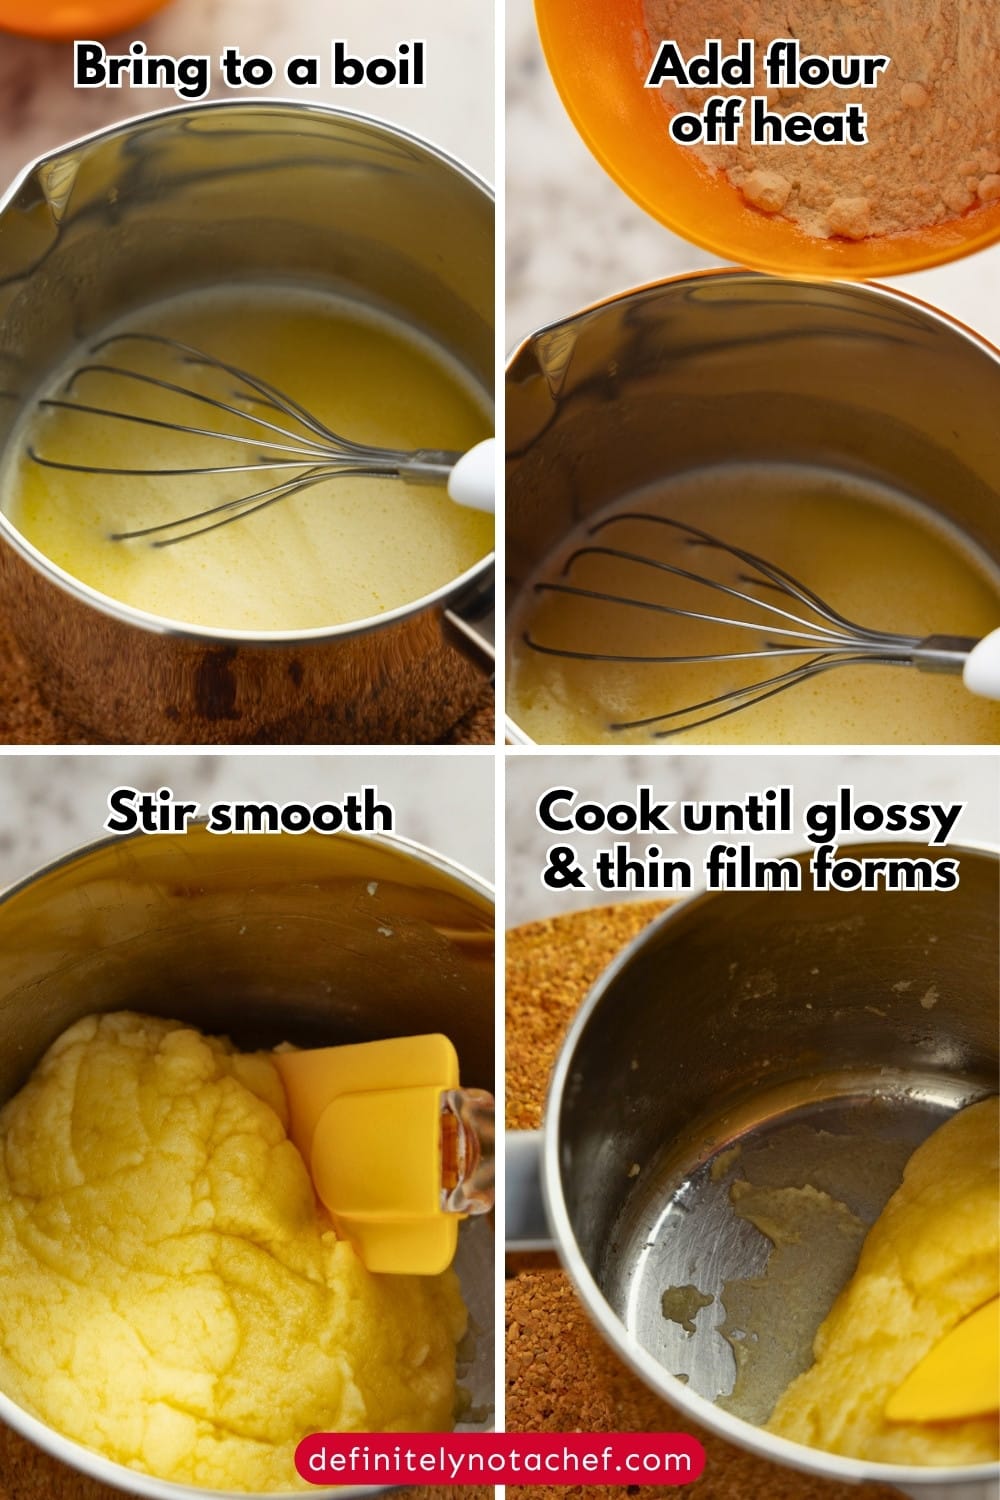
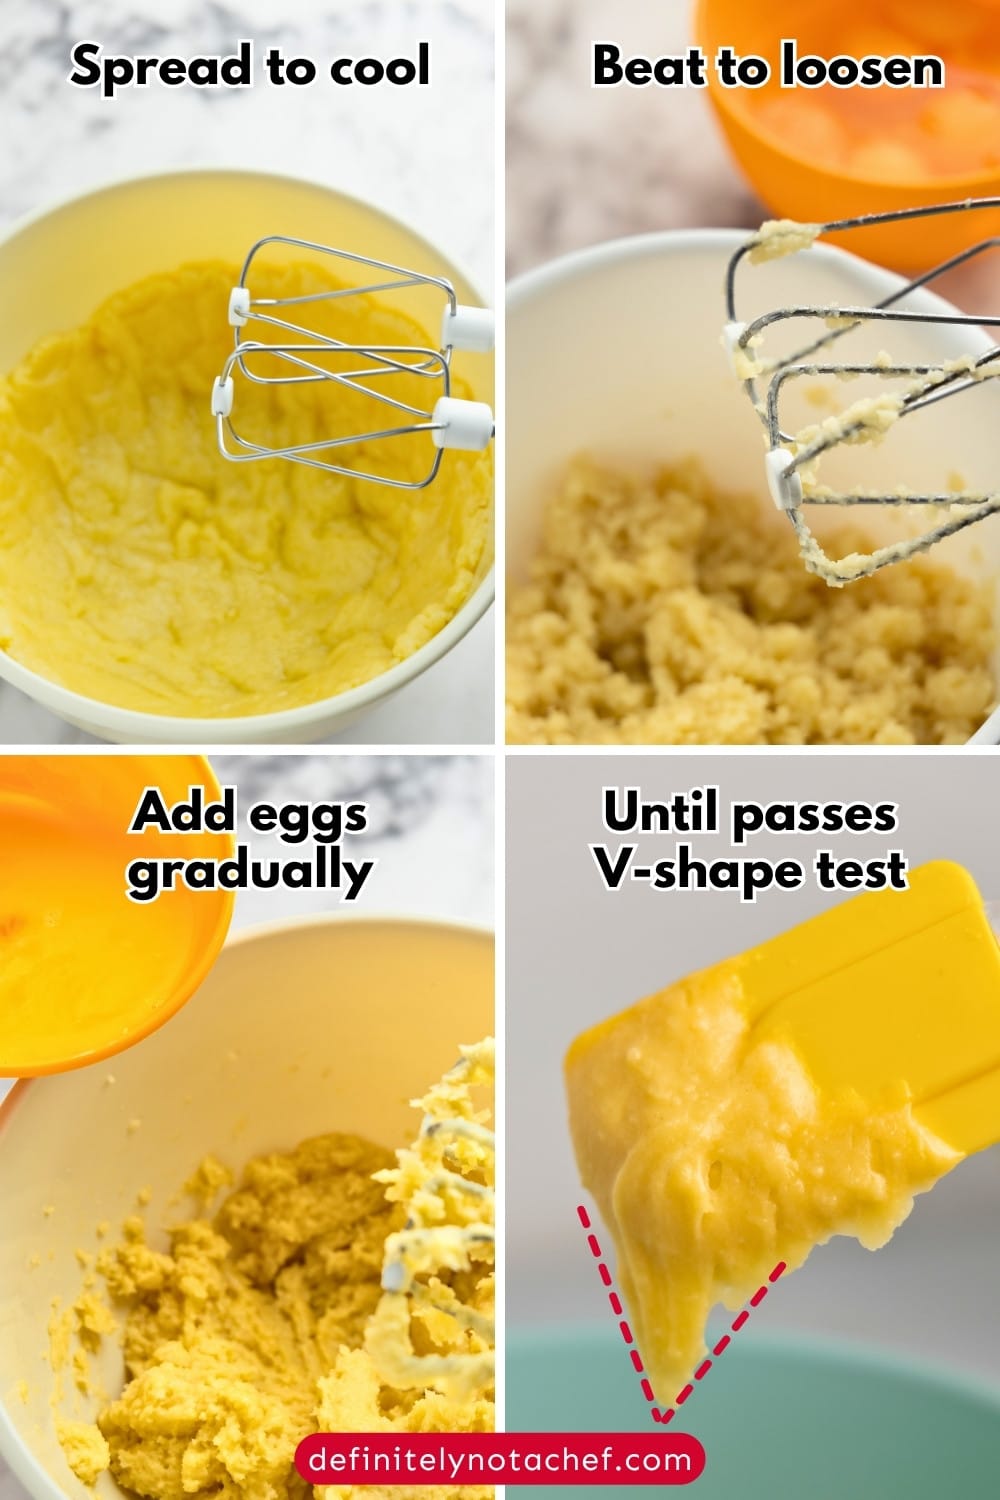
- Cool the dough. Transfer to a bowl, spreading it up the sides to help it cool faster. Let it rest for 5–10 minutes.
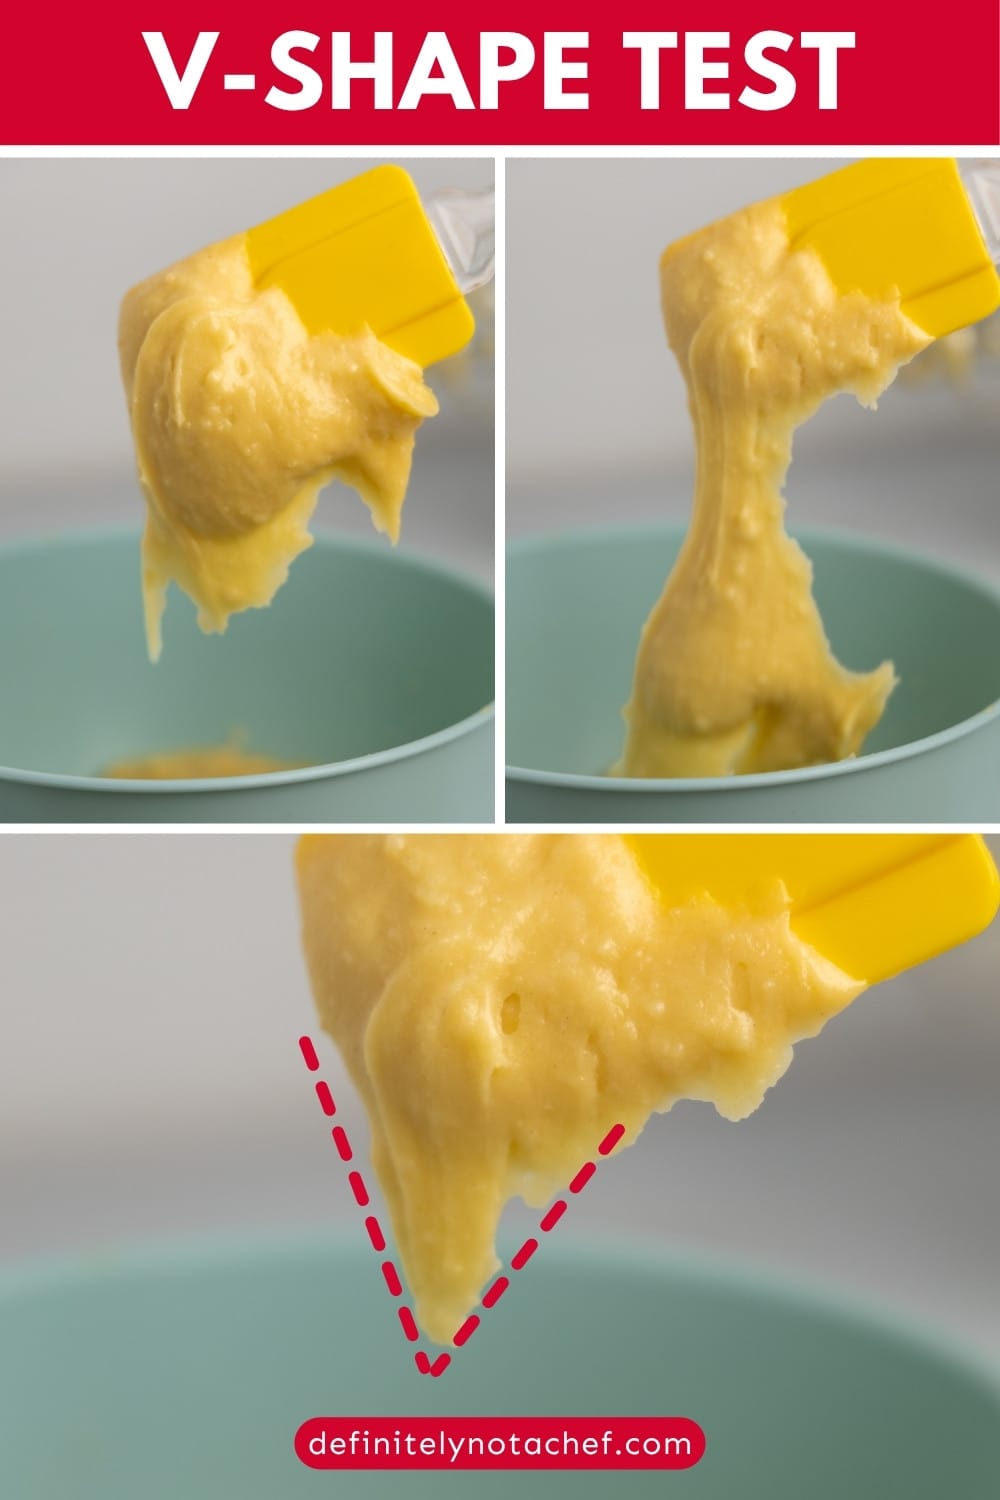
- Incorporate the eggs. Whisk the eggs in a separate bowl. Using a hand mixer, beat the dough on low and add the eggs gradually. Stop and check consistency as you go — the dough is ready when it slowly falls off a spatula in a thick V shape.
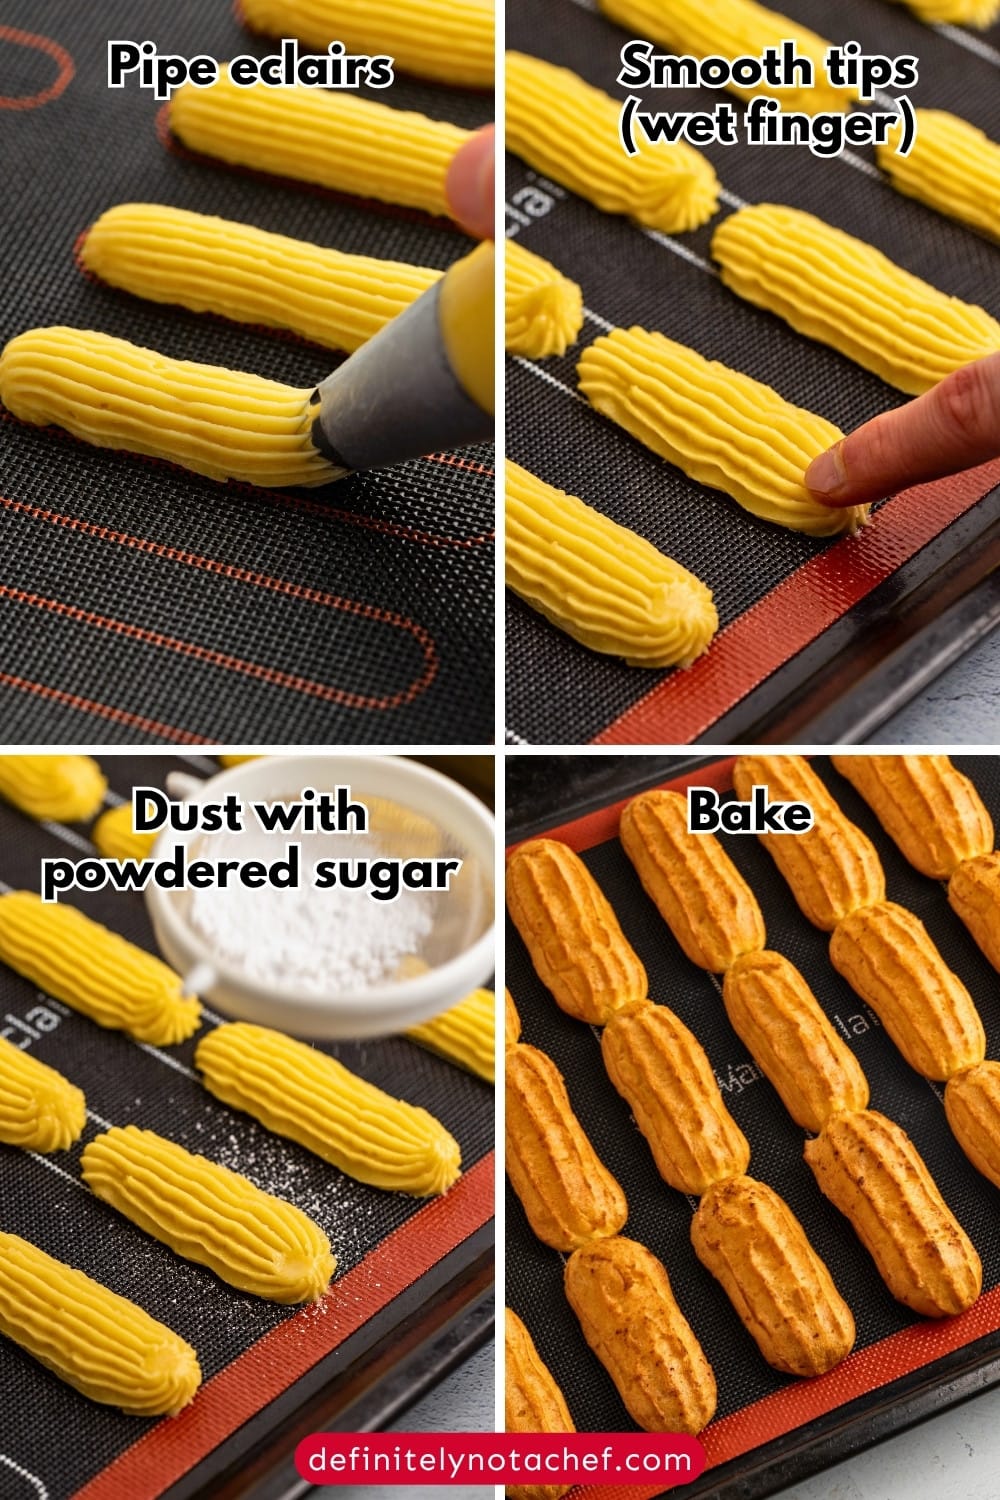
Pipe and Bake
- Prepare the tray. Line a baking tray with parchment paper, a silicone mat, or a perforated baking mat. Lightly grease the tray if using a perforated mat.
- Fill the piping bag. Transfer the dough to a piping bag fitted with a large round tip — a Wilton 6B (roughly 15mm opening) works well. A plastic bag with a corner cut off works too.
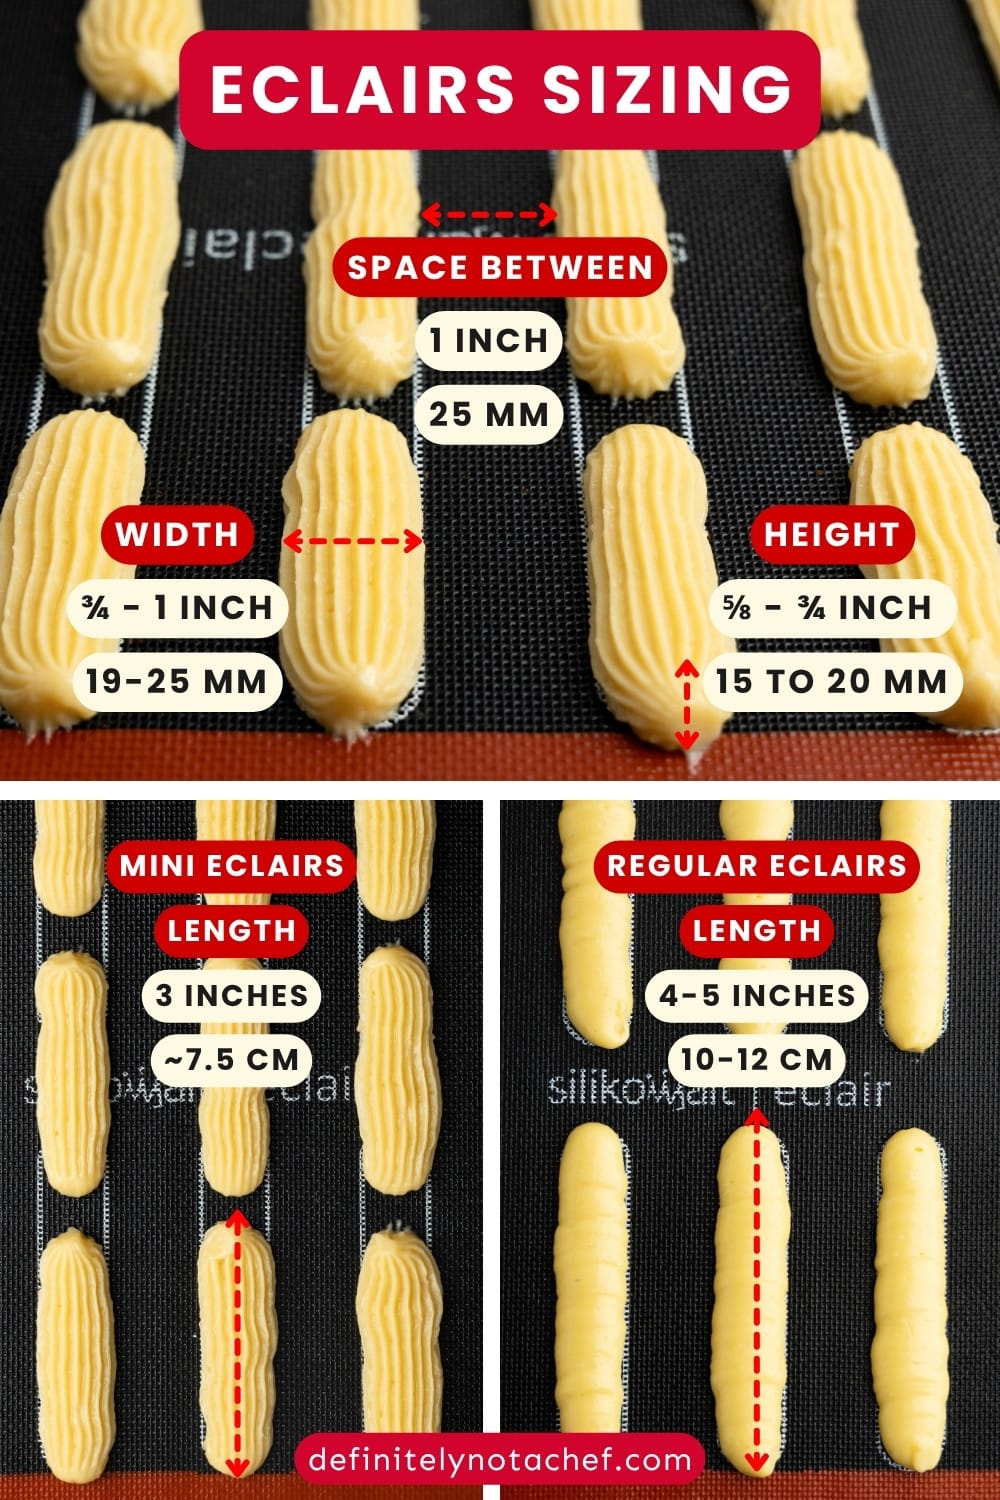
- Pipe the éclairs. Hold the bag at a 45-degree angle and pipe strips about 3 inches long for minis, leaving about an inch between each. Smooth the tips with a wet finger, then dust all éclairs with powdered sugar.
- Bake. Place in the oven and immediately reduce the temperature to 356°F (180°C). Bake for 30–35 minutes for minis (or 35 – 40 minutes for regular eclairs), venting the oven door slightly in the last 5 minutes. Cool completely before filling.
Dark Chocolate Ganache
👉 Check out our ganache 101 guide for more details.
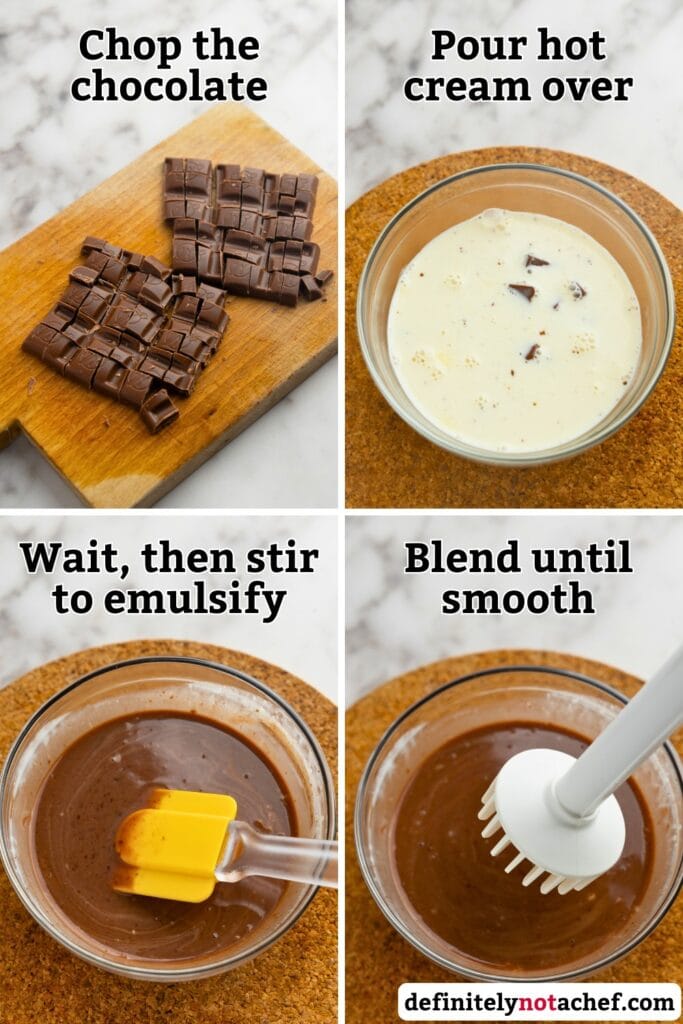
- Chop the chocolate. Chop finely into small, even pieces for faster, cleaner melting.
- Heat the cream. Warm the heavy cream over medium heat until you see tiny bubbles forming at the edges — just below a boil.
- Pour and rest. Pour the hot cream over the chopped chocolate and leave it undisturbed for 2–3 minutes.
- Stir to emulsify. Stir with a spatula until smooth and glossy. For extra shine, blend briefly with an immersion blender.
- Add the butter. If using, stir in the butter while the ganache is still warm until fully incorporated.
Assemble
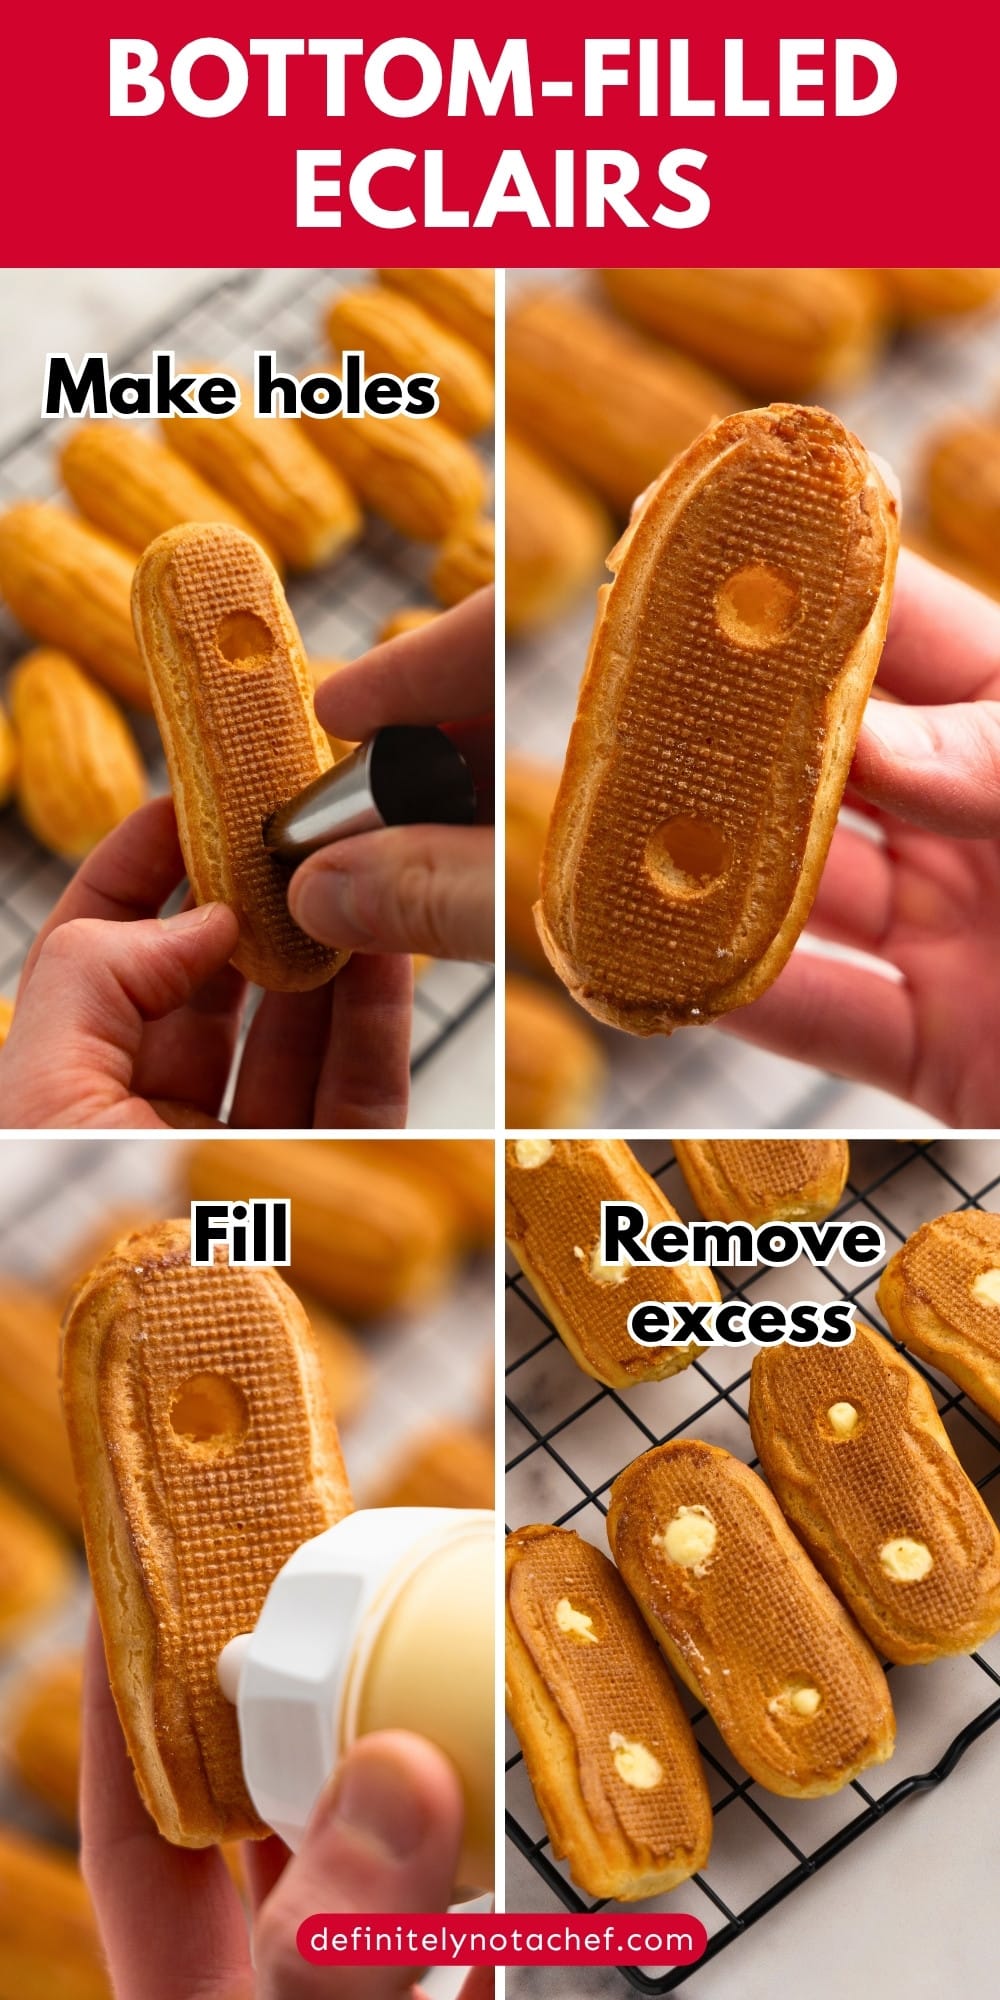
- Poke the holes. Use a small round piping tip or a paring knife to poke two holes in the bottom of each mini éclair. Check How to fill section for more details and ways to fill eclairs.
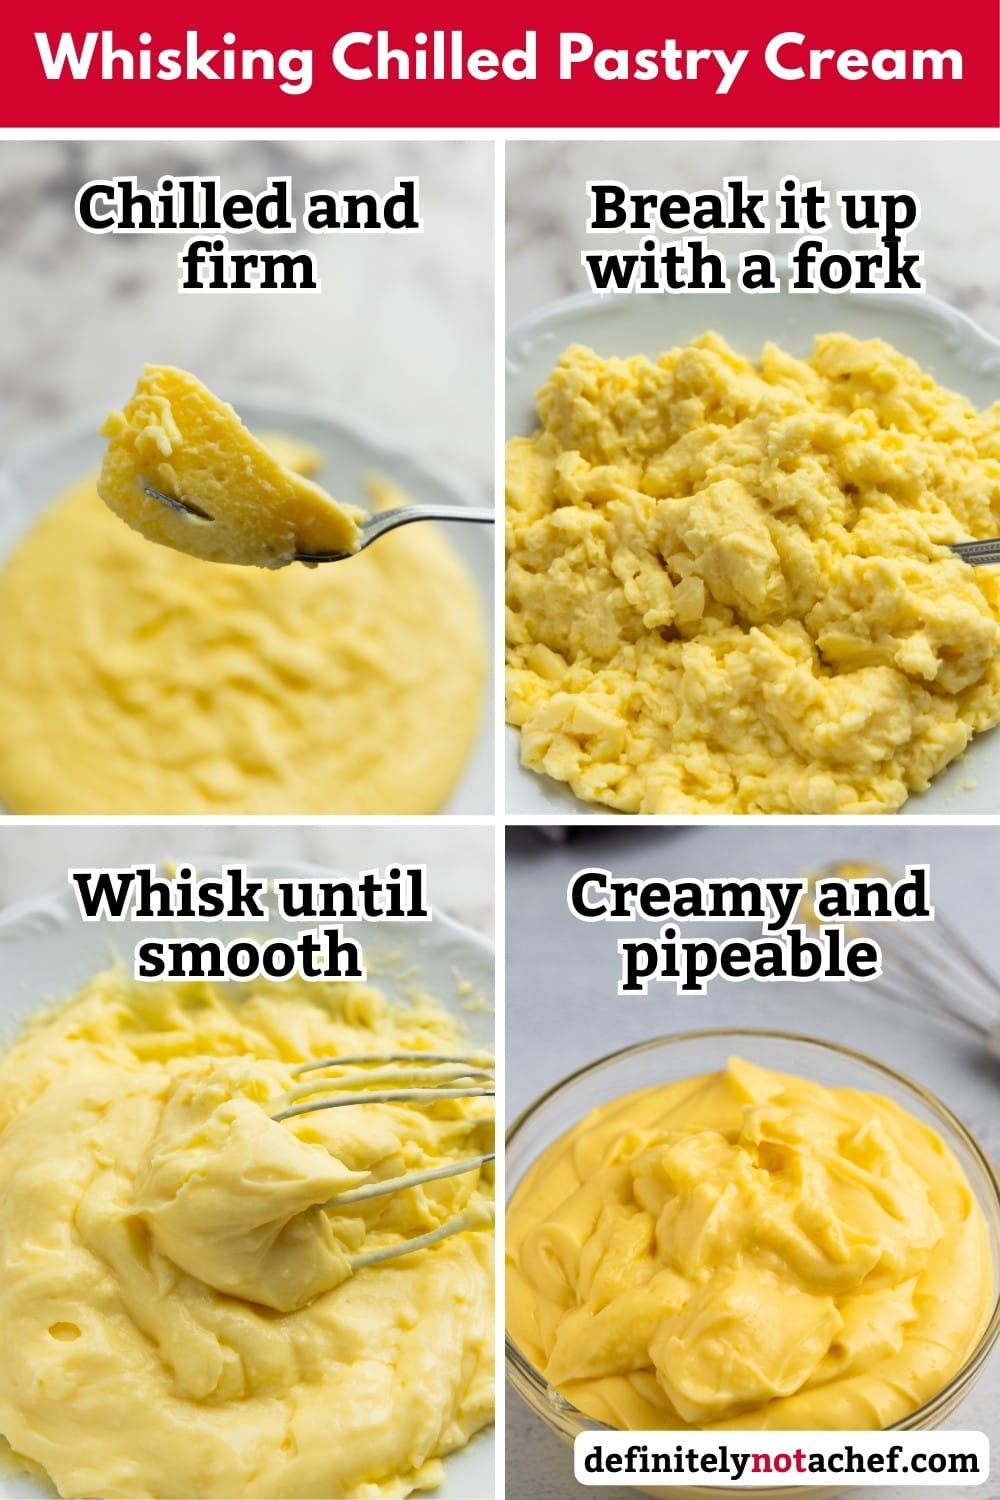
- Whisk the pastry cream. If chilled, break it up with a fork first, then whisk until smooth.
- Fill the éclairs. Pipe pastry cream into each hole until it starts to emerge from the adjacent hole or any crack.
- Top with ganache. The ganache should be thick but fluid — similar to honey. If it’s too thin, chill it briefly in a cold water bath, stirring often; if too thick, warm it gently. Dip the top of each éclair into the ganache and smooth away the excess.
- Serve or store. Enjoy immediately or refrigerate, tightly sealed.
Tips
- Don’t skip the drying step. Stirring the dough on low heat for 2–3 minutes after adding the flour isn’t just mixing — it drives out moisture and helps the dough hold its shape when piped.
- Add eggs slowly. The exact amount of egg you need depends on how much moisture cooked off during the drying step. Add gradually and stop as soon as you hit the V-shape consistency — too much egg and the dough won’t hold its shape.
- If the éclairs start browning too early, reduce the oven temperature to 320°F (160°C) after 20–25 minutes to avoid burning while the insides finish drying out.
- Don’t open the oven early. The shells need consistent heat to puff and set. Opening the door before the last 5 minutes can cause them to collapse.
Storage
Store filled éclairs in the fridge in an airtight container for up to 2 days. The choux will soften over time as it absorbs moisture from the cream, so they’re best eaten on the day of assembly.
If you want to get ahead, you can store the components separately.
The pastry cream keeps in the fridge for up to 3 days — press plastic wrap directly onto the surface. Unfilled choux shells can be stored at room temperature in an airtight container for 1 day, or frozen for up to 1 month. Thaw at room temperature and crisp them in a low oven (300°F/150°C) for a few minutes before filling.
Baking Instructions
In case the instructions in the writeup are not super clear, here’s a timeline of baking eclairs. Reduce each time by 5 minutes if baking mini eclairs:
| Time (mins:secs) | Activity |
|---|---|
| -20:00 | Preheat oven to 390°F (~200°C). |
| 0:00 | Place the tray of eclairs in the oven and reduce the temperature to 356°F (180°C) |
| 30:00 | Check the eclairs. If the tops are brownish and you’re concerned they might burn, reduce the temperature to 320°F (160°C). |
| 35:00 | If not already lowered, reduce the temperature to 320°F (160°C). Slightly open the oven door by placing an oven mitt in the gap, and leave it open. |
| 40:00 | Remove the eclairs from the oven. |
How to Fill Eclairs
There are three basic ways to fill eclairs, and you choose one based on what makes the most sense for the filling you’re using and the equipment you’ve got.
Bottom-Filled
This is my go-to method whenever I’m using pastry cream (here’s my list of pastry cream flavors). It produces gorgeous, patisserie-worthy eclairs, especially if you finish them with ganache or a thick glaze.
This technique works best for thick, stable fillings that won’t leak out through the bottom. Here’s how to do it:
- Make the holes. Use a small, round piping tip to gently poke three holes (two for minis) in the bottom of each eclair. Make sure each hole is large enough for your piping tip to fit. Alternatively, you can use a paring knife to create similar holes or cut a small “X” where you plan to insert the tip.
- Fill the eclair. Insert the tip of your piping bag (I prefer a piping syringe for this) and fill the eclair through the holes. Stop as soon as you see the filling coming out through the other holes, and the eclair is nice and heavy.
- Clean any excess. If a bit of filling oozes out, gently wipe it away.
Cut and Filled

This method is great if you:
- Plan to use multiple fillings in a single eclair
- Want to add a lot of cream—more than a bottom-filled eclair could handle
- Have a less-thick filling and worry it might leak out through the bottom
Here’s how it works:
- Cut off the top. Slice the top off each eclair. Keep each top close to its matching bottom so you don’t end up struggling to match them later.
- Fill the eclair. Pipe in your filling (or fillings), being as generous as you like.
- Replace the tops.
The only drawback is that grabbing and dipping these tops in glaze or ganache is not nearly as simple as dipping a whole, intact eclair. It’s not an issue if you’re finishing yours with powdered sugar or piping something on top, though.
Side-Filled
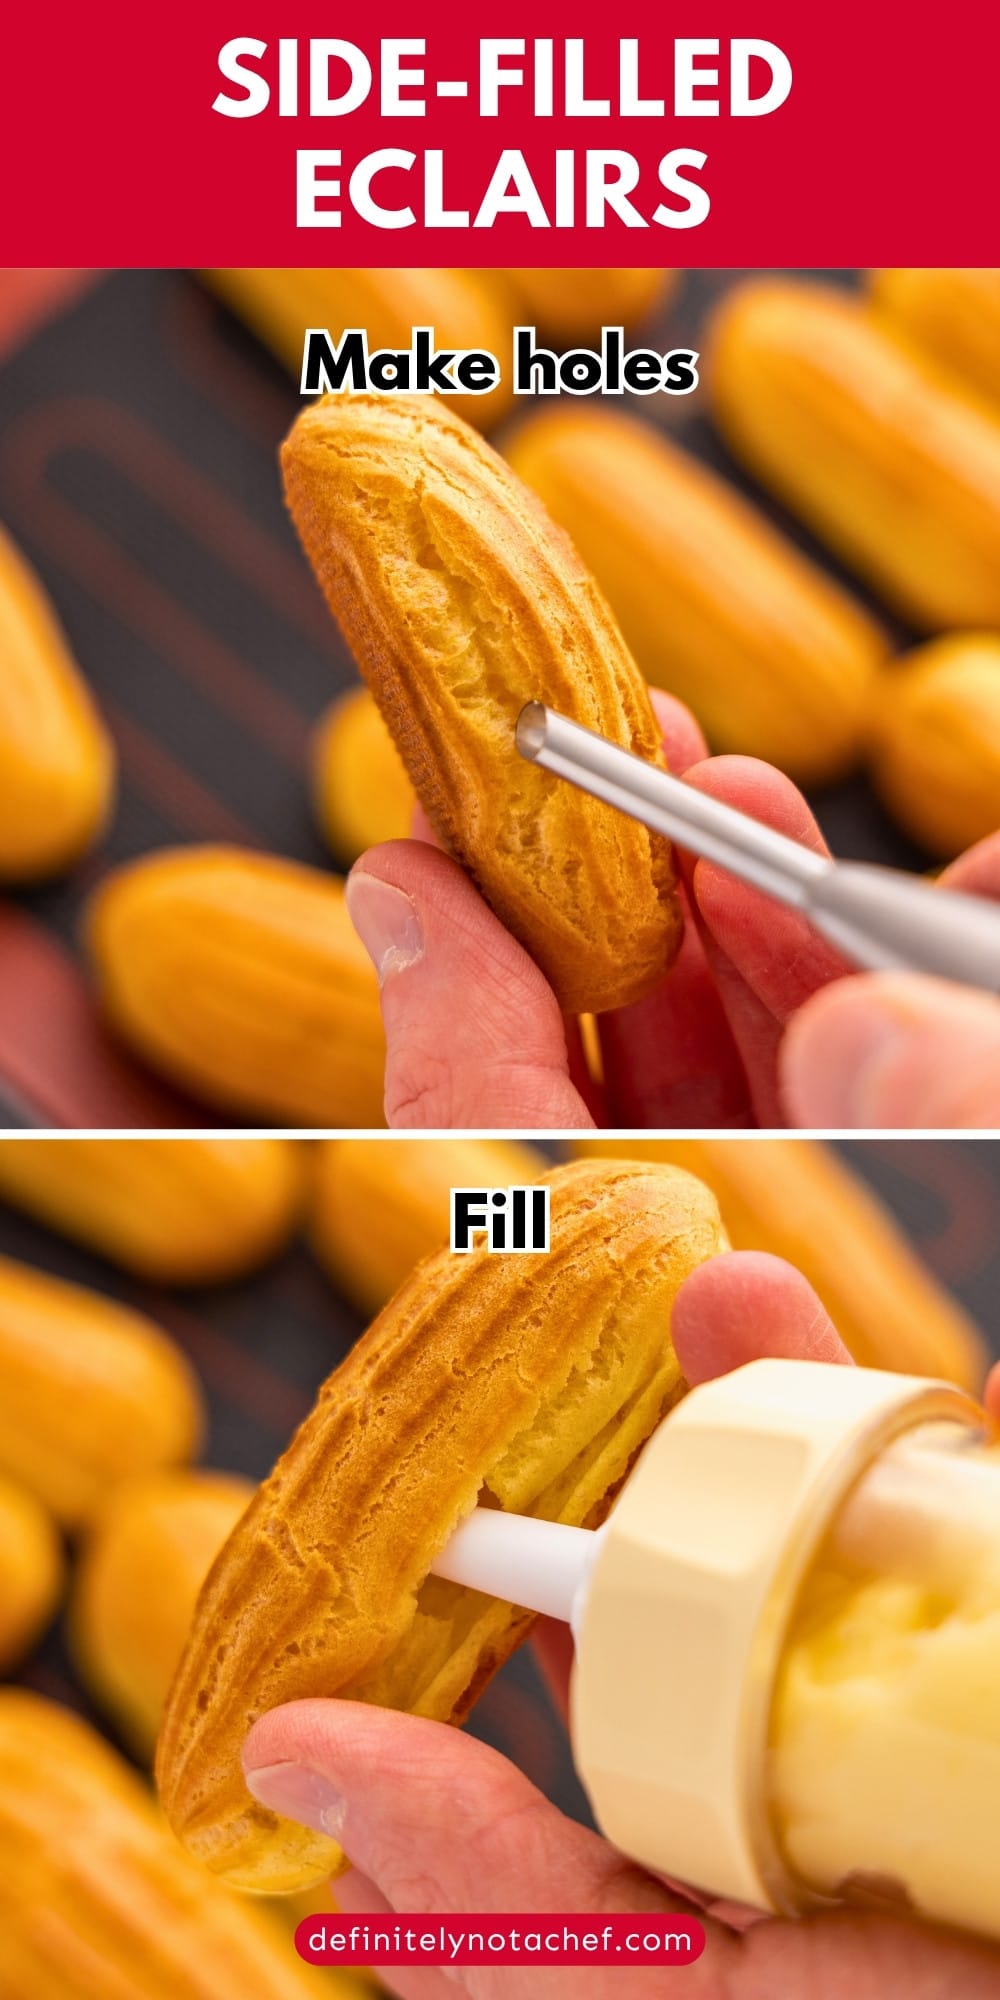
This approach is a decent option if your filling isn’t super thick and you’re worried about leakage, but you still want to keep the eclair intact. Here’s how:
- Choose a piping tip. Go for a long, narrow tip—like a Bismarck tip—that can pierce the pastry without cracking or crumbling it.
- Pierce the eclair. Gently insert the tip into one end of the eclair shell, applying just enough pressure to penetrate without breaking the pastry.
- Fill cautiously. Slowly pipe in the filling until the shell begins to expand or you feel it pushing back against the tip. Both are signs that the eclair is full.
- Clean any excess. If any filling seeps out of the hole, wipe it off gently.


This post may contain affiliate links. Read our privacy policy.
Equipment
Ingredients
Eclairs
- ¼ cup water ~60ml
- ¼ cup milk ~60ml
- 3 tbsp unsalted butter ~45g
- 2½ oz all-purpose flour ~70g, bread flour preferred
- ¼ tsp salt
- 1¼ tsp sugar 6g
- 2 large eggs ~95g cracked
- powdered sugar for dusting
Vanilla Pastry Cream
- 2 cups milk ~480g
- 4 egg yolks ~70-80g
- 5 tbsp cornstarch ~35g
- 7 tbsp sugar ~87g
- 2 tsp vanilla extract
- 2 tbsp unsalted butter ~28g
Dark Chocolate Ganache
- ⅓ cup heavy cream 80g
- ½ cup dark chocolate, chopped 85g
- 1 tbsp unsalted butter 14g, optional
Instructions
Vanilla Pastry Cream
- Boil the milk. Combine the milk, vanilla extract, and half the sugar in a saucepan. Heat over medium until steaming and just about to simmer — don’t let it boil.2 cups milk, 2 tsp vanilla extract, 7 tbsp sugar
- Prep the yolks. While the milk heats, whisk the egg yolks, cornstarch, remaining sugar, and 2 tablespoons of the warm milk together in a bowl until smooth.4 egg yolks, 5 tbsp cornstarch
- Temper the eggs. Gradually ladle the hot milk into the yolk mixture a few tablespoons at a time, whisking constantly. Keep going until all the milk is incorporated.
- Thicken the cream. Pour the mixture back into the saucepan and cook over medium heat, whisking constantly, until it thickens and starts to bubble. Once bubbling, keep whisking on low heat for another 30–60 seconds.
- Whisk off the heat. Remove from heat and whisk for another 30–60 seconds to slightly loosen the texture.
- Add the butter. Stir in the butter until fully melted and incorporated.2 tbsp unsalted butter
- Taste and adjust. Add more sugar or vanilla if needed.
- Chill. Press plastic wrap directly onto the surface of the cream to prevent a skin from forming. Cool at room temperature for 30 minutes, then refrigerate until needed.
- Final whisk. When ready to use, break up the chilled cream with a fork, then whisk until smooth.
Choux Pastry
- Preheat the oven. Heat to 390°F (200°C).
- Combine and boil. Add the butter, milk, water, salt, and sugar to a saucepan and bring to a boil, making sure the butter is fully melted before it boils.3 tbsp unsalted butter, ¼ cup milk, ¼ cup water, ¼ tsp salt, 1¼ tsp sugar
- Add the flour. Remove from heat and tip in all the flour at once. Stir vigorously to combine, then return to low heat and stir for 2–3 minutes until the dough is smooth and a thin film forms on the bottom of the pan.2½ oz all-purpose flour
- Cool the dough. Transfer to a bowl, spreading it up the sides to help it cool faster. Let it rest for 5–10 minutes.
- Incorporate the eggs. Whisk the eggs in a separate bowl. Using a hand mixer, beat the dough on low and add the eggs gradually. Stop and check consistency as you go — the dough is ready when it slowly falls off a spatula in a thick V shape.2 large eggs
Pipe and Bake
- Prepare the tray. Line a baking tray with parchment paper, a silicone mat, or a perforated baking mat. Lightly grease the tray if using a perforated mat.
- Fill the piping bag. Transfer the dough to a piping bag fitted with a large round tip — a Wilton 6B (roughly 15mm opening) works well. A plastic bag with a corner cut off works too.
- Pipe the éclairs. Hold the bag at a 45-degree angle and pipe strips about 3 inches long for minis, leaving about an inch between each. Smooth the tips with a wet finger, then dust all éclairs with powdered sugar.powdered sugar
- Bake. Place in the oven and immediately reduce the temperature to 356°F (180°C). Bake for 30–35 minutes for minis, venting the oven door slightly in the last 5 minutes. Cool completely before filling.
Dark Chocolate Ganache
- Chop the chocolate. Chop finely into small, even pieces for faster, cleaner melting.½ cup dark chocolate, chopped
- Heat the cream. Warm the heavy cream over medium heat until you see tiny bubbles forming at the edges — just below a boil.⅓ cup heavy cream
- Pour and rest. Pour the hot cream over the chopped chocolate and leave it undisturbed for 2–3 minutes.
- Stir to emulsify. Stir with a spatula until smooth and glossy. For extra shine, blend briefly with an immersion blender.
- Add the butter. If using, stir in the butter while the ganache is still warm until fully incorporated.1 tbsp unsalted butter
Assemble
- Poke the holes. Use a small round piping tip or a paring knife to poke two holes in the bottom of each mini éclair.
- Whisk the pastry cream. If chilled, break it up with a fork first, then whisk until smooth.
- Fill the éclairs. Pipe pastry cream into each hole until it starts to emerge from the adjacent hole or any crack.
- Top with ganache. The ganache should be thick but fluid — similar to honey. If it’s too thin, chill it briefly in a cold water bath, stirring often; if too thick, warm it gently. Dip the top of each éclair into the ganache and smooth away the excess.
- Serve or store. Enjoy immediately or refrigerate, tightly sealed.
Nutrition
Recipes to Try
Looking for more? Here’s a couple of hand-picked options:
- Eclair fillings. Looking for a filling for your next eclairs? Here’s a list.
- Eclair recipes. Looking for a different flavor? Check out my full list of éclair recipes from classic chocolate to dulce de leche, caramel, and more.