
Farmer’s Cheese Pierogi (Pierogi z Serem)
A classic Polish sweet pierogi recipe made with lightly sweetened farmer’s cheese.
Farmer’s cheese pierogi — known in Poland as pierogi z serem — are one of the most traditional sweet pierogi fillings. Made with lightly sweetened twaróg (farmer’s cheese), eggs (or egg yolks), and a touch of vanilla, they’re a classic Polish comfort food that’s simple to prepare and freezer-friendly.
In Poland, sweet cheese pierogi are a staple at family dinners and holidays, traditionally served with melted butter and powdered sugar, and often paired with fresh berries or simple berry sauces when in season.
If you’re making homemade pierogi and want an authentic, family-friendly sweet pierogi filling that’s easy to work with, this is the one to start with.
(Can’t buy farmer’s cheese? Use cream cheese instead and follow my sweet cheese pierogi recipe.)
👉 Want the full pierogi workflow in one place, in video form? My FREE pierogi course walks through dough, filling, shaping, and cooking step by step.
Ingredients Notes and Substitutes
Pierogi Dough
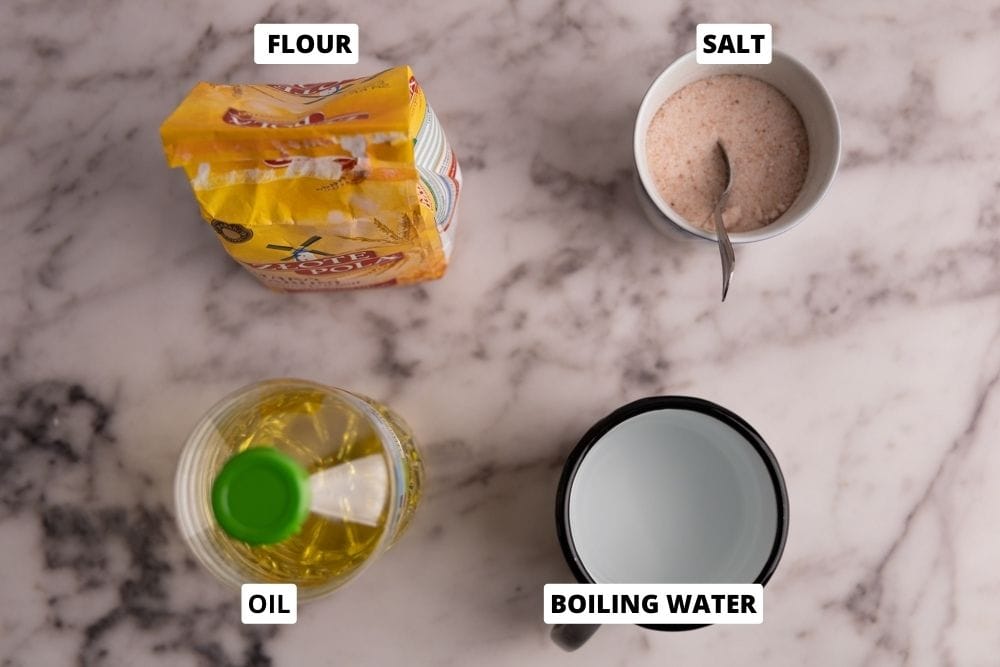
- Flour. Use all-purpose flour. Bread flour or whole wheat flour will require more liquid to reach the right dough consistency.
- Oil. Use a neutral-flavored oil. Avoid olive oil, as its flavor can come through in the dough.
- Salt. Fine-grained salt dissolves more evenly in the dough.
- Water. Use freshly boiled water.
Farmer’s Cheese Pierogi Filling

- Farmer’s Cheese. This filling is traditionally made with twaróg, a fresh Polish cheese. In English, it’s most often labeled as farmer’s cheese and sometimes as quark. Twaróg is a fresh, slightly tangy cheese with a firm, crumbly texture. It looks similar to cottage cheese but without the liquid — it should be dry, compact, and easy to mash. Avoid aged or cured versions (anything resembling cheddar or low-moisture mozzarella), as they won’t work here.
- Egg or 2 Egg Yolks. Egg yolks make the filling slightly richer and smoother, with a deeper flavor. A whole egg keeps things simple and avoids leftover egg whites, with a slightly lighter texture. Both work well — it comes down to whether you prefer a richer filling or a more straightforward approach.
- Sugar. White granulated sugar is the classic choice and keeps the flavor clean. You can adjust the amount to taste. Brown sugar or coconut sugar will work but will slightly change the flavor and color of the filling.
- Vanilla Extract. Not traditional, but a small splash enhances the sweetness and rounds out the flavor. Optional.
Step-By-Step: How to Make Farmer’s Cheese Pierogi
Step 1: Make Dough
👉 For a more detailed walkthrough, see the full pierogi dough recipe with step-by-step photos and tips.
- Boil a pot of water.
- Combine the dry ingredients. Add the flour to a large bowl and sprinkle in the salt. Give it a quick stir to distribute the salt evenly.
- Add oil and boiling water. Pour in the oil, then carefully add the boiling water. Stir immediately with a spoon or fork. Mix until the water is fully absorbed and there are no visible pockets of liquid left.

- Switch to your hands. Once the dough is cool enough to handle, gather everything into a loose, shaggy ball. Don’t worry if it looks rough — that’s normal.
- Knead (press, fold, turn). Press the dough against the bottom of the bowl with the palm of your hand. Fold it back onto itself, give it a slight turn, and repeat. As you knead, the dough will become smoother and more elastic. This usually takes about 4–6 minutes. You shouldn’t need to add extra flour or oil — it will come together with time. You’re aiming for a fairly smooth dough ball that isn’t sticky. It doesn’t have to be perfect.

- Wrap and rest. Wrap the dough tightly in plastic wrap and let it rest for at least 30 minutes (60 minutes is perfectly fine). Resting relaxes the gluten, making the dough easier to roll and helping it hold its shape when filling.

Step 2: Prep Farmer’s Cheese Filling
- Mix the filling. In a bowl, combine the farmer’s cheese, sugar, and vanilla extract (if using). Stir until evenly blended and smooth enough to scoop. Taste and adjust the sweetness if needed. If you prefer a slightly tangier filling, you can add a small splash of lemon juice.
- Add the egg or egg yolks. Stir in one whole egg or two egg yolks until fully incorporated. The filling should be thick, creamy, and easy to scoop. Use it right away, or refrigerate until ready to assemble the pierogi.

Step 3: Fill and Shape
👉 For a complete overview of different ways to fill and shape pierogi, see the Pierogi 101 guide.
- Divide and roll the dough. Divide the dough into two or three portions. Roll one portion out on a lightly floured surface, flipping the dough every few passes to prevent sticking. Dust with a small amount of flour as needed—use just enough to keep the dough from sticking. Roll the dough to about 2–3 mm thickness. Keep the remaining dough wrapped so it doesn’t dry out.

- Cut the dough. Cut the rolled dough into palm-sized circles using a glass, cutter, or pierogi maker. Gather the scraps into a ball and reuse them when rolling the remaining dough.
- Fill and seal (tabletop method). Place a spoonful of the farmer’s cheese filling in the center of each dough circle. Fold the dough over the filling to form a half-moon shape. Press the edges together, starting in the middle and working outward. Try to push out as much air as possible before sealing completely. If needed, lightly moisten the outer edge of the dough with a wet finger to ensure a tight seal.

- Cover as you go. Place the formed pierogi on a floured baking sheet and cover them with a damp kitchen towel to prevent the edges from drying out. Lightly flour areas where pierogi touch to keep them from sticking.

- Repeat. Continue rolling, filling, and shaping until you run out of dough or filling.
Step 4: Cook
- Boil the water. Bring a large pot of water to a rolling boil and salt it generously—about 1 teaspoon of salt per quart of water.
- Cook in batches. Add a few pierogi to the boiling water and stir gently to prevent sticking. Once they float to the surface, lower the heat and simmer for 2–3 minutes. Don’t overcrowd the pot.
- Remove and serve. Lift the pierogi out with a slotted spoon and serve right away, or set aside for pan-frying.


How to Serve
Here are a few ways to serve farmer’s cheese pierogi:
- Serve boiled. Enjoy them straight after cooking for a soft, tender texture. They’re lightly sweet and perfectly good on their own.
- Pan-fry in butter. For extra flavor and texture, pan-fry the cooked pierogi in butter over medium heat until golden on both sides.
- Top with butter and powdered sugar. This is the most traditional sweet serving style in Poland. Melted butter and a light dusting of powdered sugar are often all you need.
- Serve with sour cream. A spoonful of sour cream adds tang and balances the sweetness. You can lightly sweeten the sour cream if you like.
- Add fresh berries or berry sauce. Fresh strawberries, blueberries, or raspberries pair especially well. You can also spoon over a simple blended berry sauce for a more dessert-style presentation or even make a fruit compote.
👉 For more ideas, see the guide to pierogi sauces and toppings.

This post may contain affiliate links. Read our privacy policy.
Equipment
Ingredients
Pierogi Dough
- 2 cups all-purpose flour ~250g
- ¼ tsp salt
- 1 ½ tbsp oil
- ½ cup boiling water ~120ml
Farmer's Cheese Pierogi Filling
- 18 oz farmer’s cheese ~510 g
- 1 egg or 2 egg yolks
- 4 tbsp sugar ~56 g
- 1 teaspoon vanilla extract optional
Instructions
Make Dough
- Boil Water: Boil a pot of water.½ cup boiling water
- Mix Dry Ingredients: In a large bowl, stir flour and salt.2 cups all-purpose flour, ¼ tsp salt
- Wet Ingredients: Add oil and boiled water.1 ½ tbsp oil
- Stir: Mix the ingredients by stirring with a spoon or fork until there is no visible water in the bowl. Be careful not to burn yourself.
- Knead: Merge the contents of the bowl into a rough dough ball, then knead for 4 to 8 minutes until the dough is smooth and there are no dry spots left.
- Wrap and Rest: Wrap the dough ball tightly in plastic wrap and let it rest for about 30 minutes before continuing.
Prep Filling
- Make Filling: Mix farmer's cheese, sugar, and vanilla extract. Taste and add more sugar or some lemon juice if needed.18 oz farmer’s cheese, 4 tbsp sugar, 1 teaspoon vanilla extract
- Add Egg or Yolks: Incorporate the egg or yolks, then refrigerate if not using immediately.1 egg
Combine
- Cut Dough: Divide the rested dough into 2-3 portions, roll out the first on a floured surface to a thin but sturdy thickness.
- Form Circles: Use a round cutter or glass to cut dough circles, repurposing any remnants for extra pierogi.
- Make Pierogi: Place filling on a dough circle, fold and seal from the center, expelling trapped air. Moist edges with a wet finger if needed.
- Cover: Move pierogi to a flour-dusted surface, covered by a damp towel. Dust flour on touching areas to prevent sticking.
Cook
- Boil: Cook pierogi in boiling, salted water until they float, then simmer for 2-3 additional minutes.
- Scoop: Use a slotted spoon to extract the cooked pierogi from the pot.
- Serve: Serve the finished pierogi hot.
Notes
Explore More Pierogi Fillings
If you’re looking to explore different pierogi fillings, start here:
- All Pierogi Fillings – a complete overview of sweet and savory pierogi fillings
- Sweet Pierogi Fillings – dessert-style pierogi with fruit and cheese fillings
- Vegan Pierogi Fillings – plant-based filling ideas for pierogi