Strawberry Pierogi Recipe
Looking for some sweet pierogi to satisfy your sweet tooth? Get ready to impress your taste buds with these delicious strawberry pierogi. The sweet and juicy strawberries are wrapped in a soft and chewy dough that will melt in your mouth.
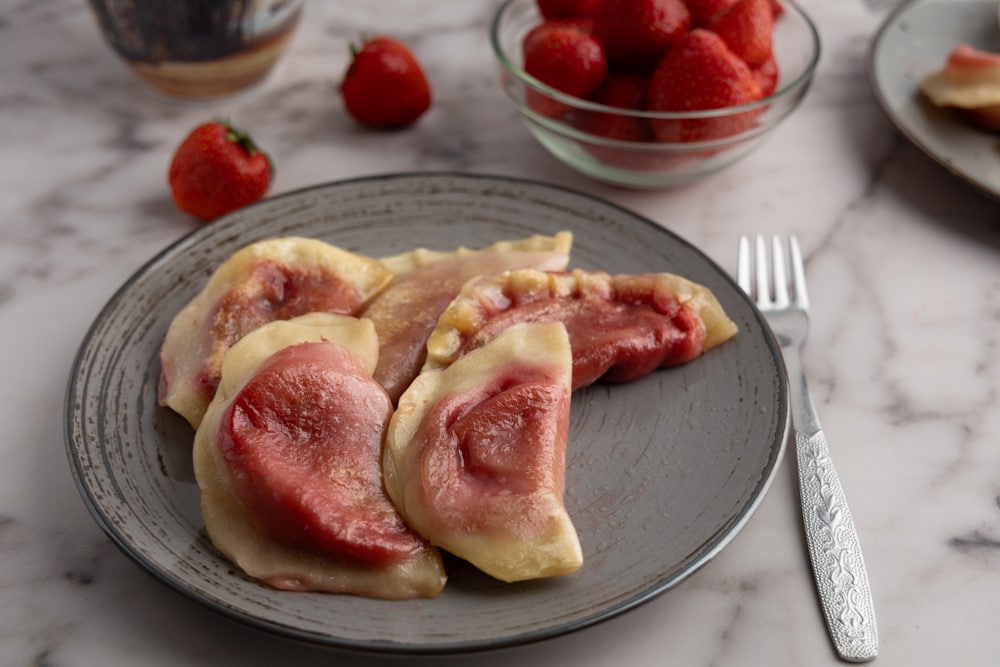
Strawberry pierogi are one of the pierogi with a sweet filling that you have to try. So jump in no matter if it’s the strawberry season and you have a bunch of fresh strawberries, or it’s the middle of the winter, and yours sit in the freezer.
Recipe Info
This strawberry pierogi recipe is:
- Perfect for everyone. These little treats are a hit, no matter how many candles are on your birthday cake.
- Cool with fresh or frozen strawberries. Fresh or frozen, we’re not picky. We’ve got two filling methods: one that’s best for fresh strawberries and another that’s good for both options.
- A bit of a challenge. Now, if you try the cooked filling (kinda like my blueberry pierogi), it gets a bit soft, which makes the wrapping part a little trickier than, let’s say, a lentil pierogi. You might get a bit messy before you get the swing of things. The trick? Start with less filling than you think you’ll need. If you don’t want to fuss, there’s an easier version with whole strawberries.
- Great for freezing. Go ahead, make a bunch! You can easily double or triple the batch and stash some in the freezer for later. A total time saver!
If you’re making strawberry pierogi for the first time, read the ingredients notes, step-by-step instructions, and tips. If you’re a veteran, feel free to jump to the recipe card.
Extra Learning
Before we jump in, here are a few handy resources to help you nail this recipe:
- Homemade Pierogi for Beginners. My pierogi guide that walks you through the pierogi making process, start to finish. Whether you’re new to pierogi or just need a refresher, this guide has you covered.
Ingredients and Substitutes
Pierogi Dough
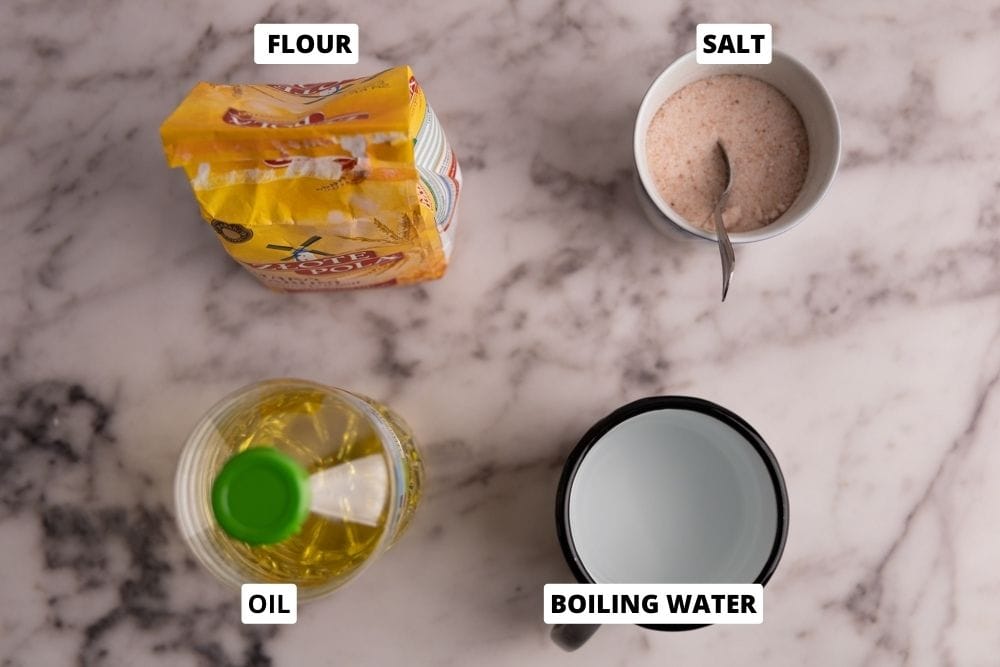
- Flour. Use all-purpose flour. If you use something like bread flour or whole wheat flour, you will need noticeably more liquid to achieve the right dough texture.
- Oil. Use a neutral-flavored oil, such as your regular cooking oil. Avoid olive oil as it can be bitter, which may affect the dough’s flavor.
- Salt. Use fine-grained salt for best results.
- Water. Plain boiled water is all you need; no need to be fancy here.
Strawberry Pierogi Filling

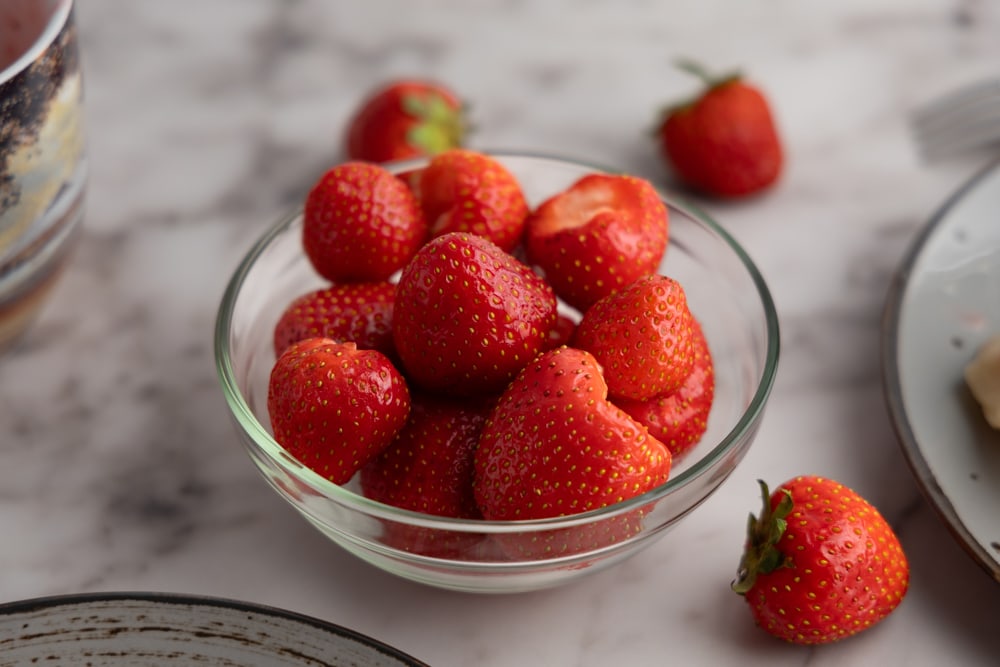
- Strawberries. Fresh and frozen are both okay, though which ones you have will affect which filling you go for.
- White sugar. Using brown sugar or coconut sugar should also work okay, but expect the flavor to be slightly altered.
- Cornstarch. We need cornstarch or potato starch to thicken the filling. Other thickening agents should work okay, though you’ll need to adjust the amount.
- Lemon juice. This is totally optional, but if you want to make the filling slightly more sour, a splash of lemon juice is all you need.
Your Filling Choices
In this recipe, we dive into two filling options. Each has its own strengths and weaknesses. Here’s the lowdown on both:
- Whole Strawberries. This is the default go-to method for making strawberry pierogi. It’s as simple as wrapping an entire strawberry with the pierogi dough, maybe tucking in an extra quarter or two if there’s room. While this method is pretty straightforward, these pierogi usually need a sweet sauce or a sprinkle of powdered sugar to reach their full flavor potential. Without it, they tend to be a bit on the tart side. This method shines with fresh strawberries, but frozen ones can join the party too. Just remember not to thaw them – you want to wrap those berries while they’re still firm and frosty. Otherwise, it could get messy.
- Cooked Strawberry Sauce. I’m a fan of this filling because it lets you fine-tune the sweet-sour balance by adding sugar and lemon juice, so the pierogi taste spot-on, even if you ditch the sweet topping and just drizzle on some melted butter. And this one’s a trooper, working well whether you’re team fresh or team frozen strawberries. Just ensure you thaw the fruits before getting started.
Step-By-Step: How to Make Strawberry Pierogi
tep 1: Make Dough
(Read more about this in our vegan pierogi dough recipe.)
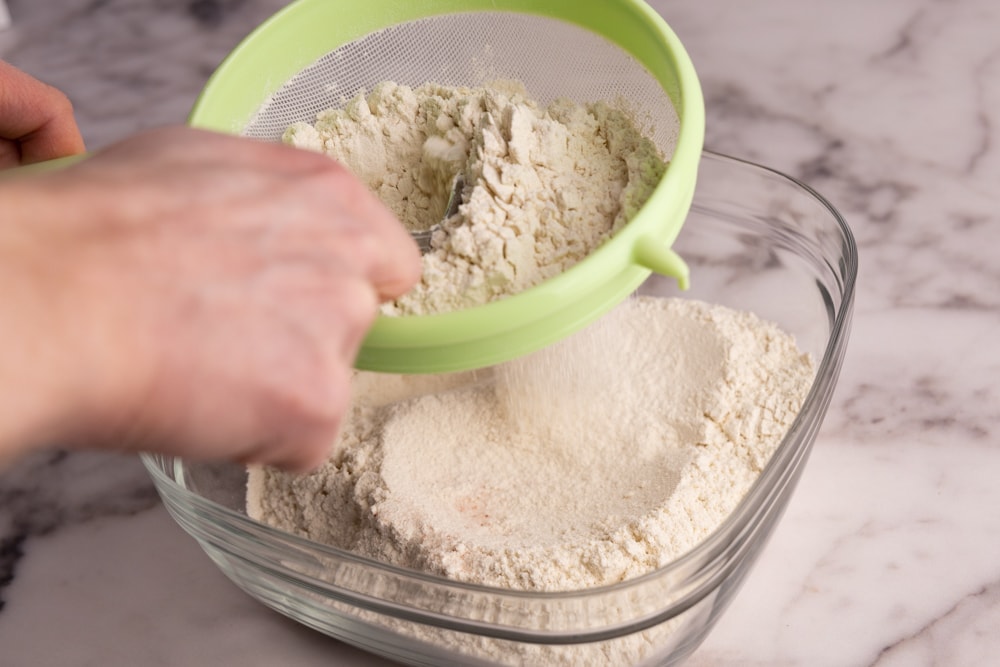
- Boil a pot of water.
- Sift flour into a large bowl. Sifting probably isn’t necessary, but I recommend it anyways. Plus, it’s something you can do while waiting for the water to boil.
- Add salt and mix. Just a quick stir to spread the salt.
- Add oil and boiled water.
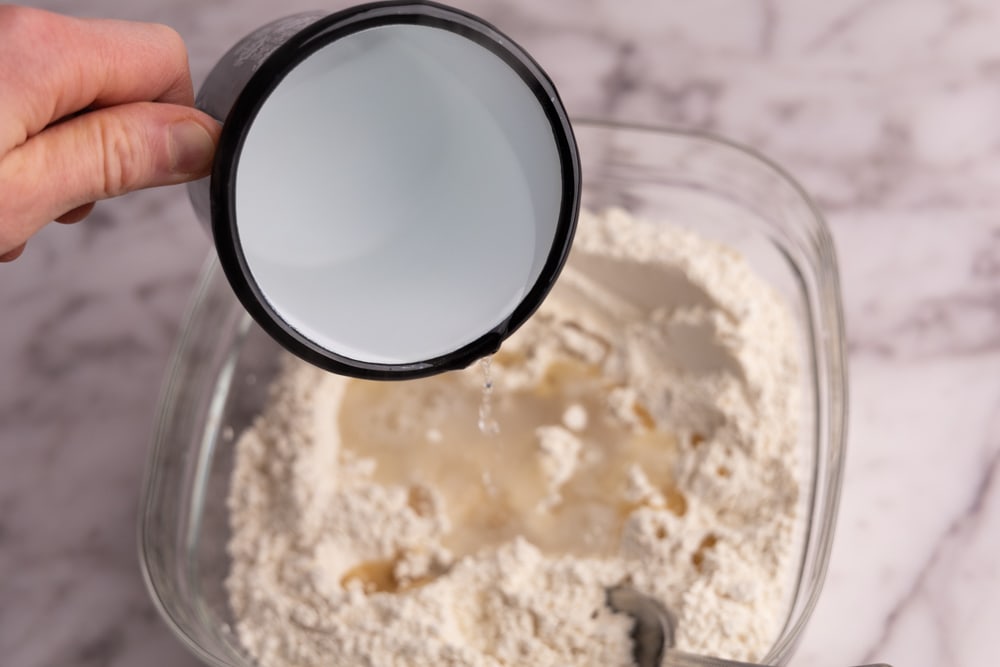
- Mix. Mix the ingredients by stirring with a regular tablespoon or a large wooden spoon. Be careful not to burn yourself, as you will be working with water that was boiling just a few moments ago. Stir until you reach the point where there is no visible water in the bowl, then switch to using your hands.
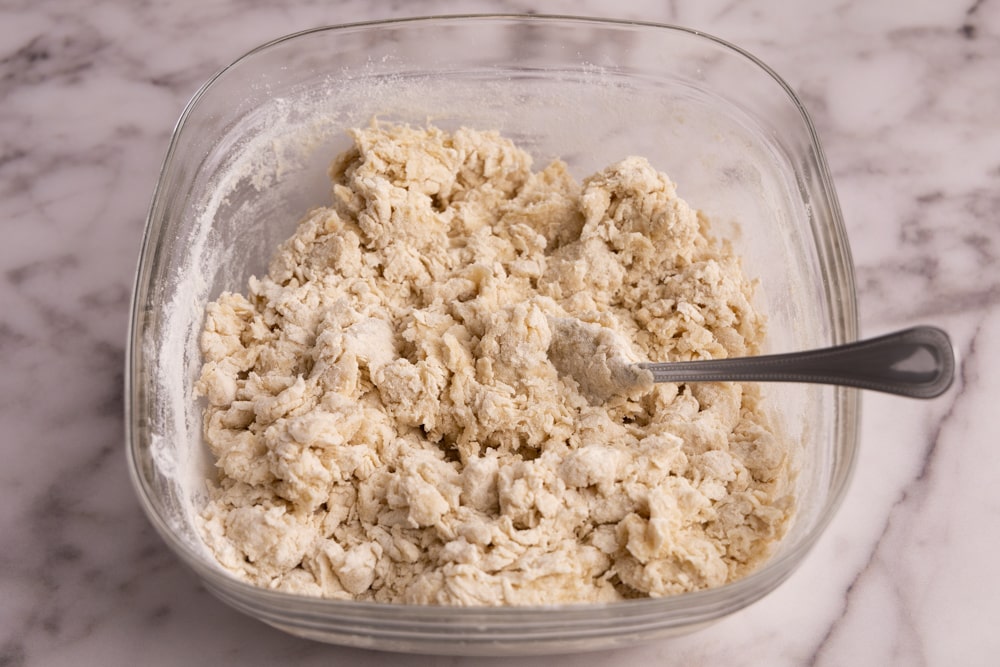
- Knead. Start slowly and make sure the dough isn’t too hot to handle. Knead until you have incorporated all the flour into a homogeneous dough ball, which usually takes 4 to 8 minutes.
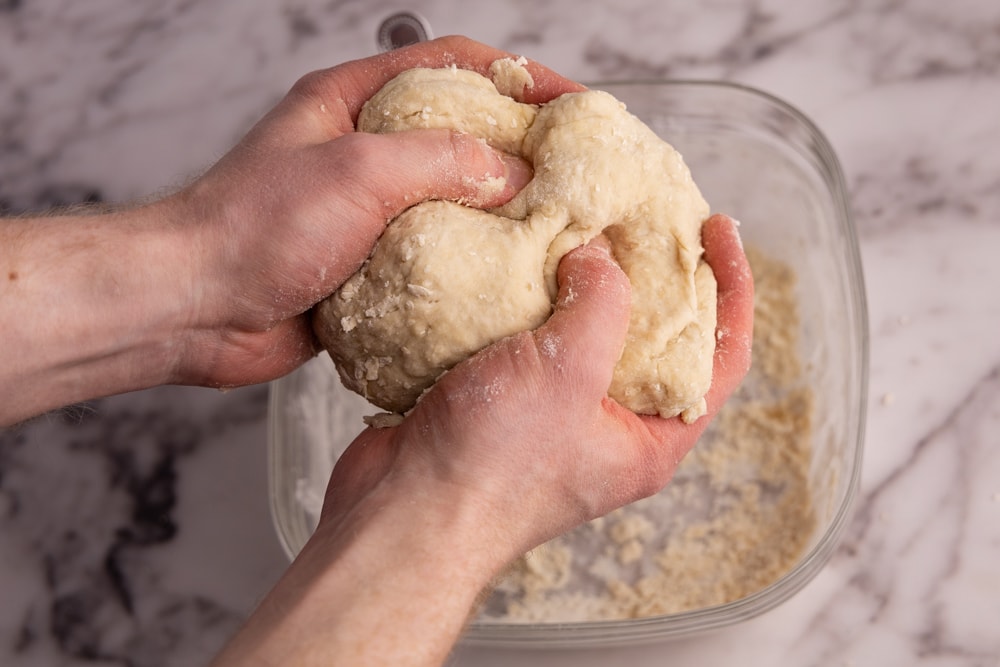 Kneading in progress. Note that there’s still flour left in the bowl.
 Dough ready – all the flour is incorporated and the dough is pretty homogenous.
- Wrap and rest. Wrap the dough ball tightly in plastic wrap and let it rest for about 30 minutes before continuing. This will allow the dough to relax and become easier to work with.

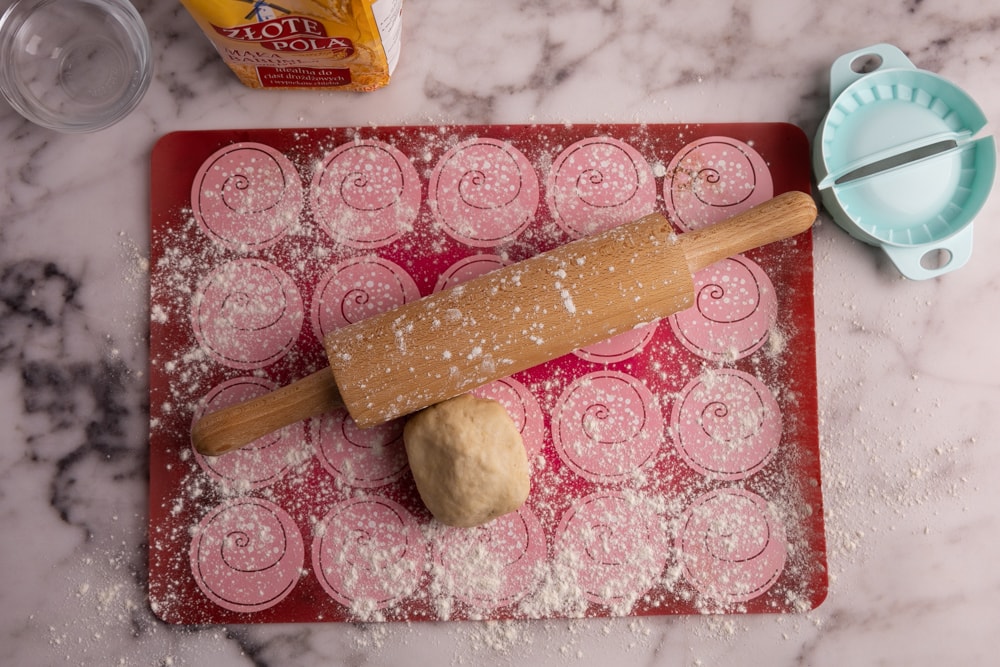
- Make pierogi. Once that half an hour of waiting is over, the dough is ready for rolling and making pierogi.
Step 2: Prep Filling
- Decide on your filling. You can go with whole strawberries, a cooked strawberry sauce, or a mix of both. If you’re working with frozen strawberries and want to make the cooked filling, defrost the berries.
- Prep. Start by washing and drying your strawberries if you’re working with fresh ones.
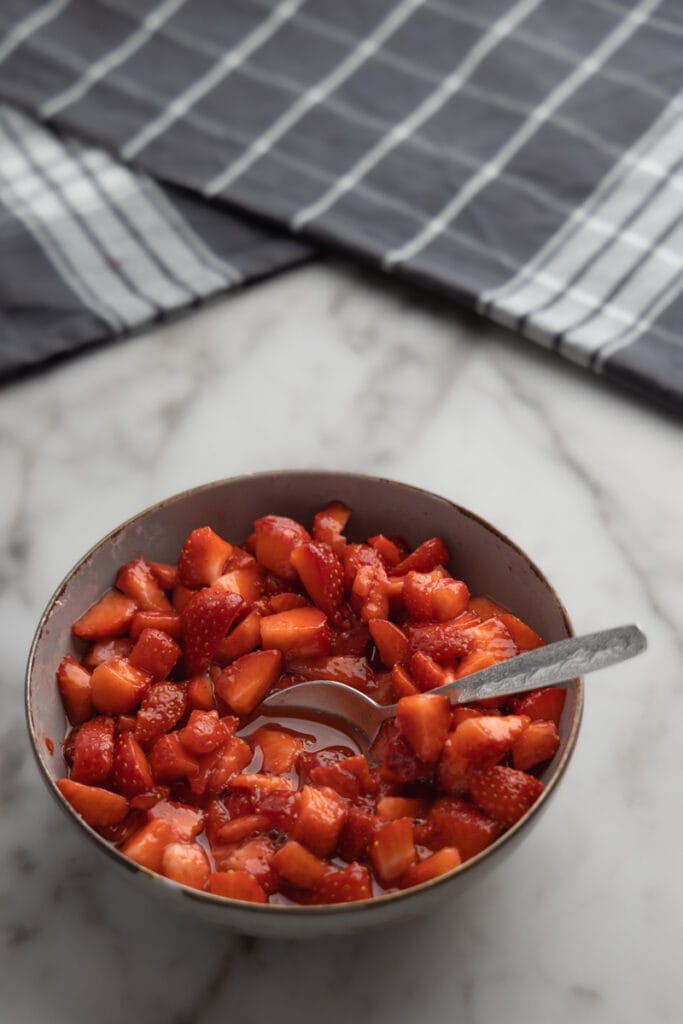
- Cut. If choosing the cooked filling, cut your strawberries into smaller pieces. Aim to cut a small strawberry into four pieces and a large strawberry into up to 8 or 10 pieces. This will help to fit as much of the filling into the pierogi as possible. Mix the cut strawberries with the sugar and cornstarch. Stir well and set them aside for 10 to 15 minutes to allow the sugar to draw out moisture from the strawberries.
- Cook filling. Cook the strawberry mixture in a saucepan on low heat, stirring constantly, until it becomes hot and starts to thicken. Finally, take the mixture off the heat, adjust the sweetness or acidity if needed by adding more sugar or lemon juice, and let it cool down to room temperature. Refrigerate if not using right away.
Step 3: Combine
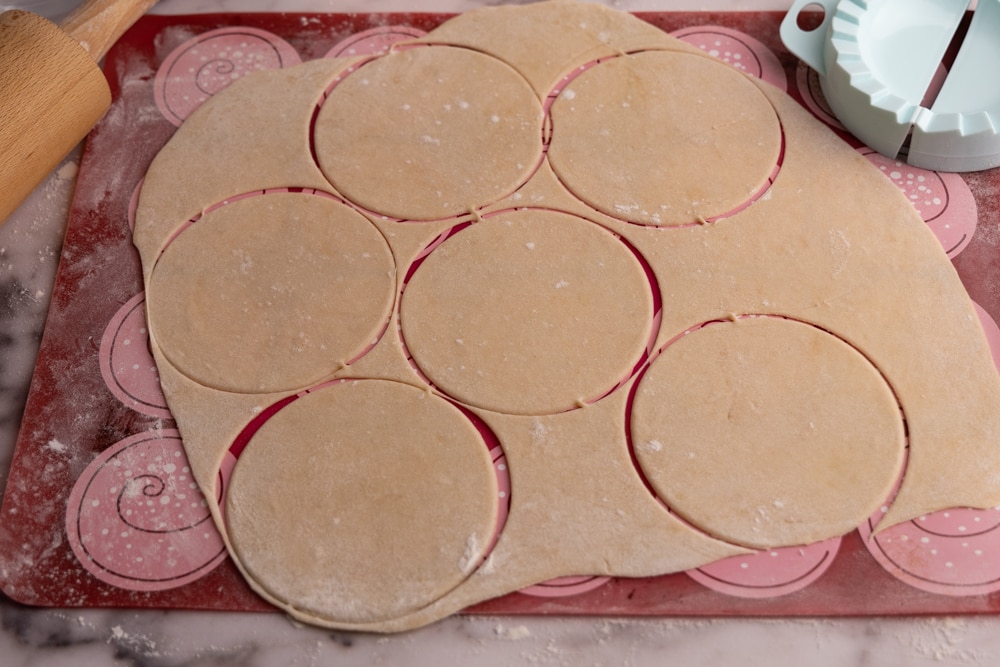
- Divide. Divide the pierogi dough into two or three parts. Take one part and spread it on a floured work surface, then roll it out until it’s nice and thin. Be careful not to roll it too thin, as it may tear when you form the pockets and seal the dough around the filling. Wrap the rest of the dough tightly to prevent it from drying out.
- Cut into circles. Cut palm-sized circles in the rolled pierogi dough. Anything round with a somewhat sharp edge is great, but a simple glass or mason jar works as well. Or use your pierogi maker if you have one. Form a ball with the dough left over after cutting and use it when rolling out the rest of the pierogi.
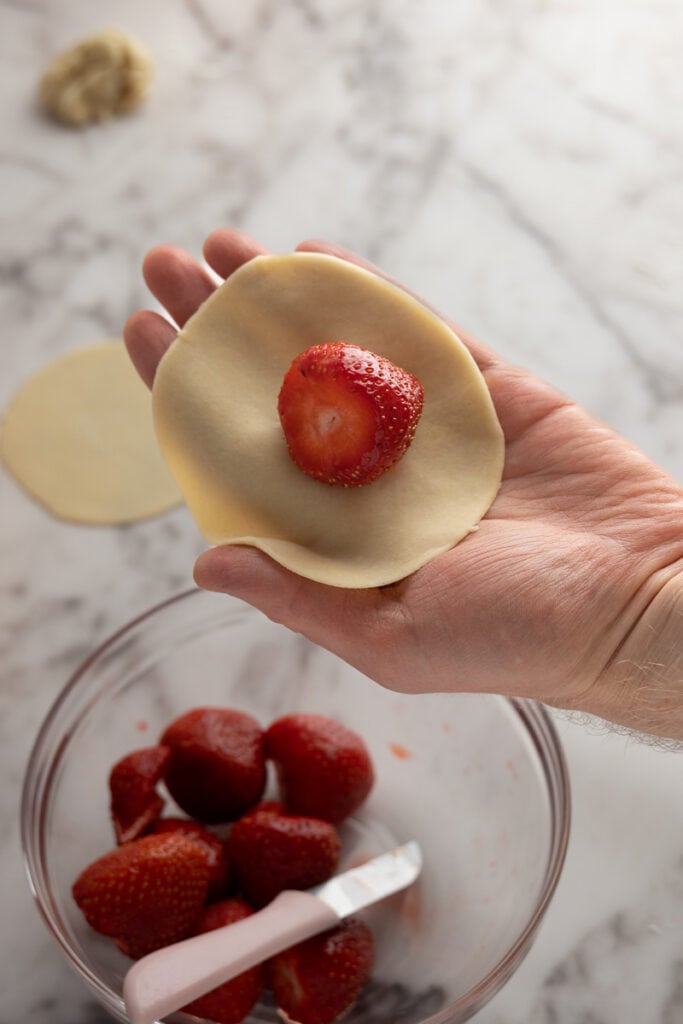
- Whole strawberries. If you’re using whole strawberries as your filling, follow these steps:
- Place a whole strawberry in the middle of the stretched dough.
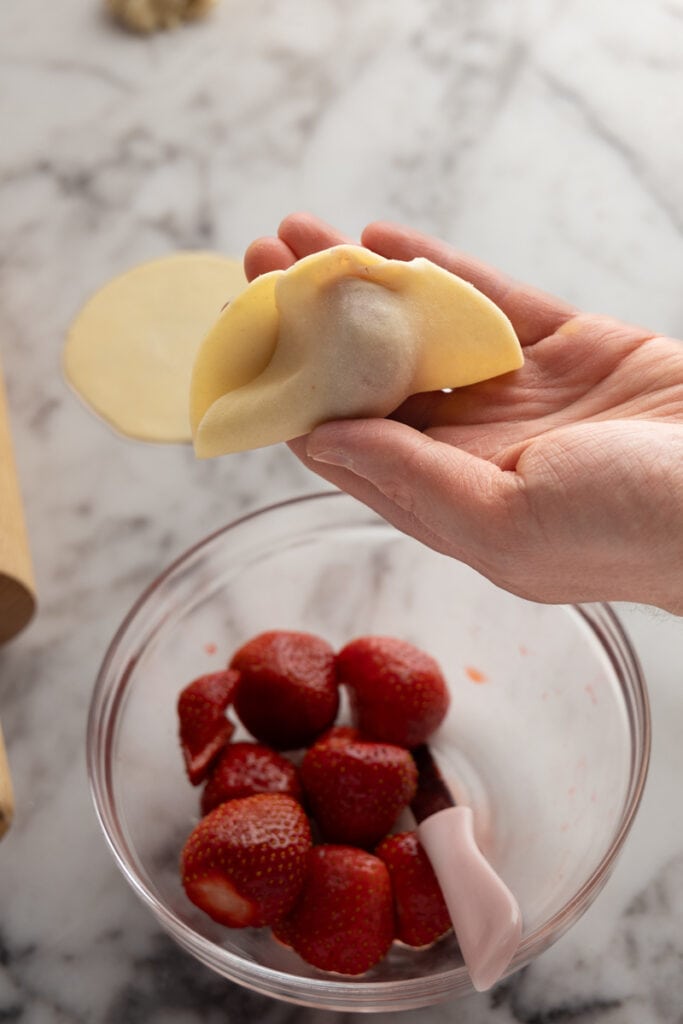
- Fold the dough over the strawberry and pinch it together in the middle so the dough completely wraps around the strawberry.
- Continue pinching the dough in one direction and then the other to form a full pocket.
- If there’s a lot of free space inside, add a quarter or a half of a strawberry on either side before sealing the edges.
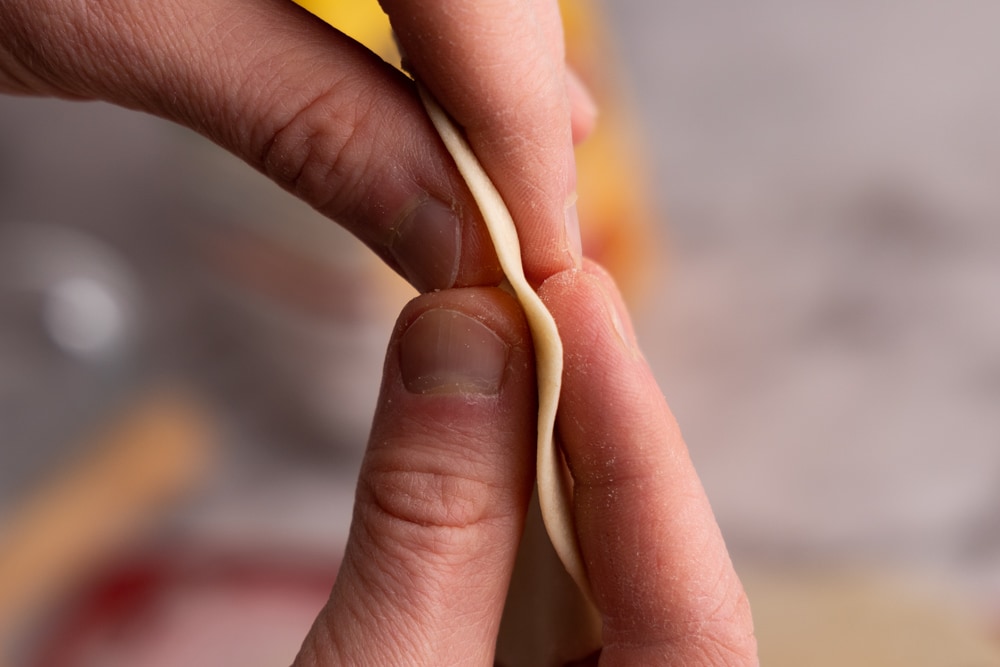
 Seal in the middle
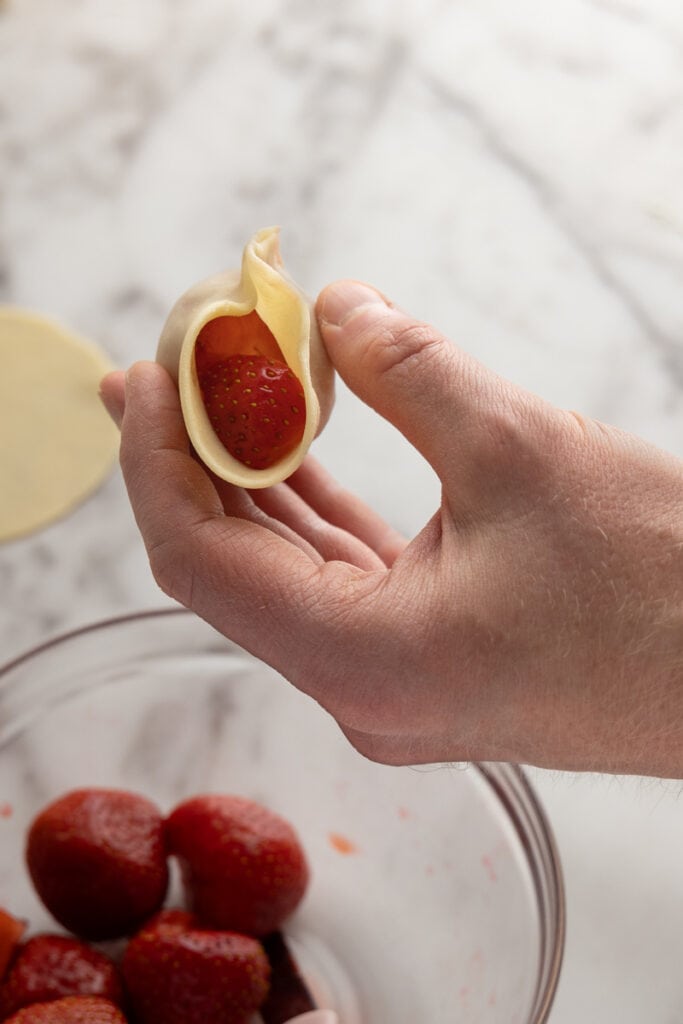 Squeeze in an extra quarter on the side
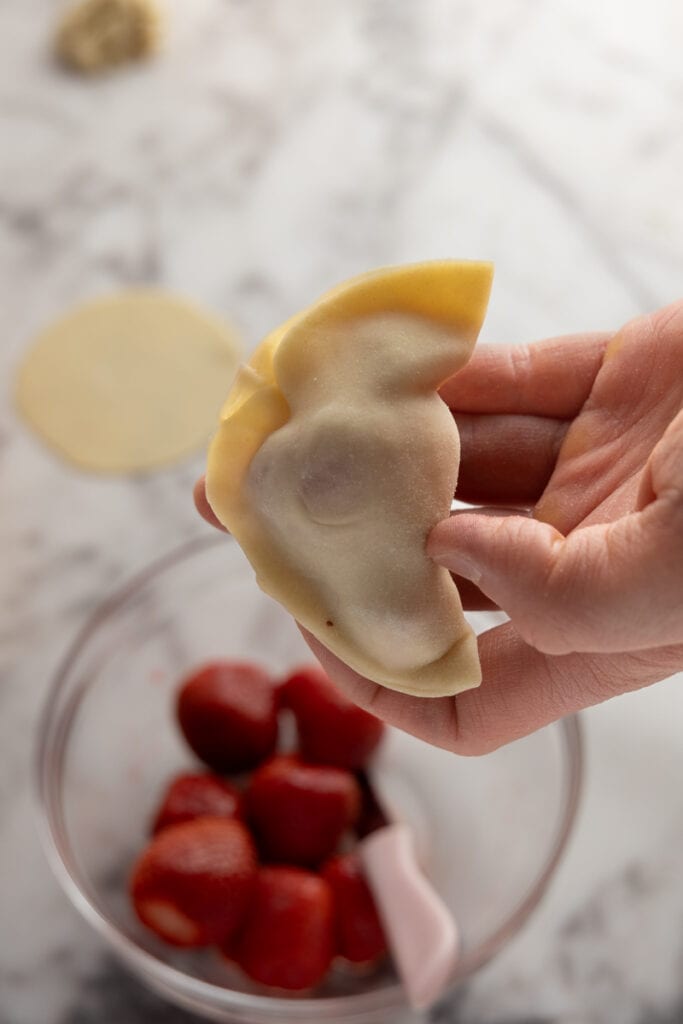 Seal the deal
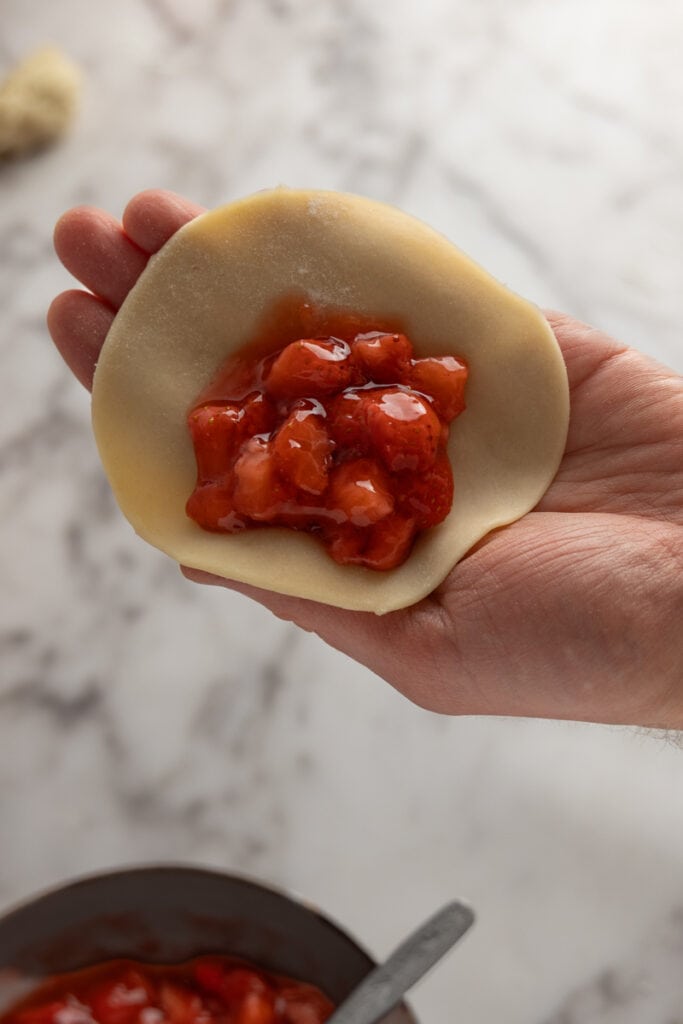
- Cooked strawberry filling. If you’re using the cooked strawberry sauce, follow these steps:
- Create a small well by cupping your hand slightly, palm up, and place the dough circle in there.
- Scoop up a teaspoon or so of the filling and place it in the well. Be mindful not to overfill as the dough usually needs less filling than you might think.
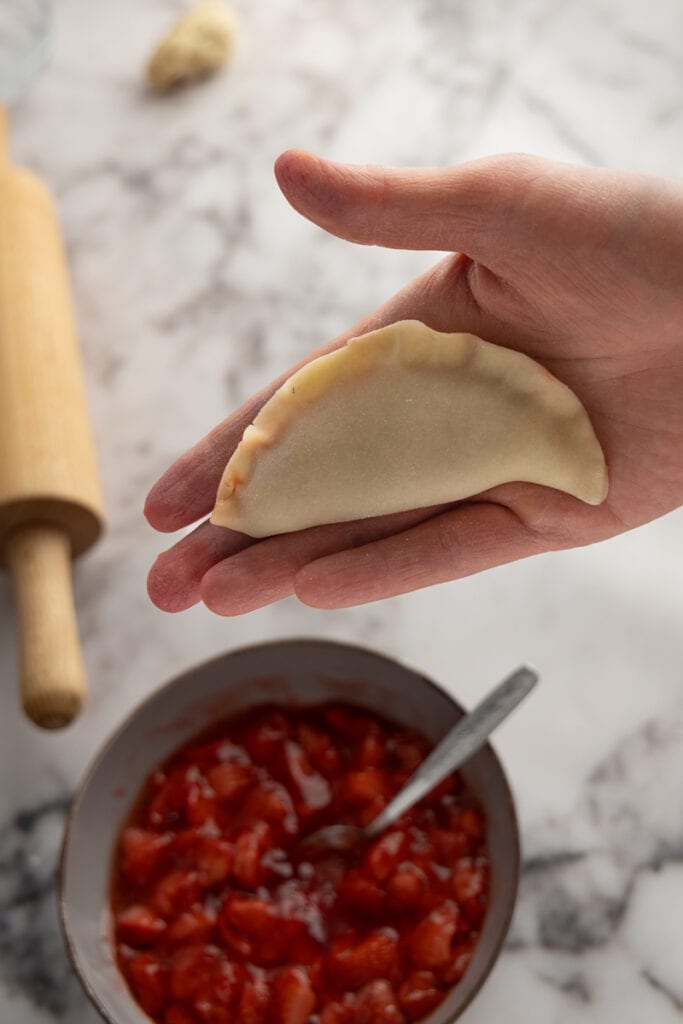
- Fold the dough over the filling and press the edges together to form a pocket. Start sealing in the middle, then move to one side until the very end.
- Turn the pierogi upright so that the sealed half is on the bottom, and press together the upper half. This helps the filling move towards the bottom and reduces the chances of it spilling out. As you seal the upper half, you might want to give the pierogi a gentle shake to help the filling settle towards the bottom.
- Cover with damp towel. Place each formed pierogi on a floured cookie sheet and cover them with a damp kitchen towel. The edges will dry out quickly otherwise. If you want to save space and let the pierogi touch each other, lightly brush the areas where they’ll touch with flour. This will prevent them from sticking together and causing the pierogi dough to tear when removed for boiling.
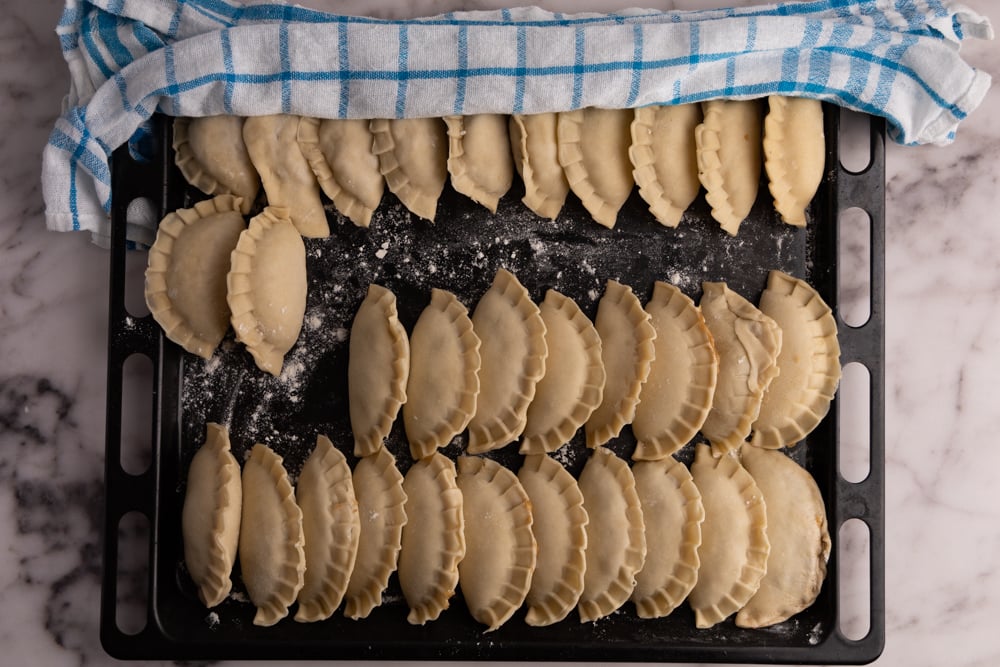
- Make more pierogies. Continue forming pierogi until you run out of dough or filling.
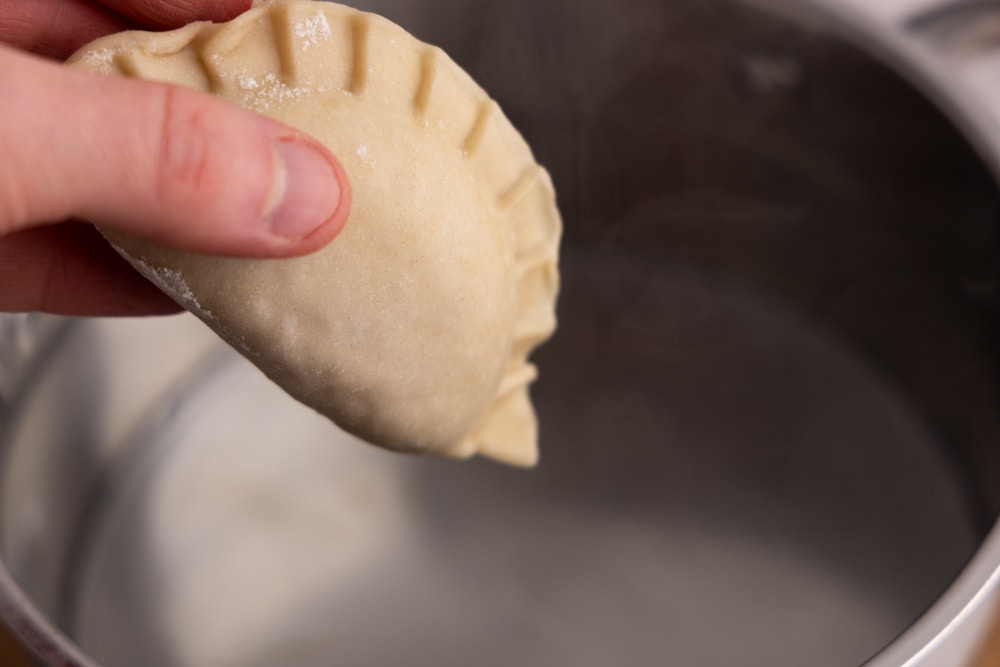
Step 4: Cook
- Boil water. Bring a large pot of salted water to a boil. I typically use one teaspoon of salt per quart of water but feel free to adjust the amount to your preferences.
- Add a few pierogi. Once the water is boiling, add a few pierogi to the pot and stir them to prevent them from sticking to the bottom. Once the pierogi start floating to the surface, simmer them gently for another 3 to 4 minutes. Make sure not to overcrowd the pot so that the pierogi don’t stick together or cook unevenly.
- Remove. Remove the pierogi from the water using a slotted spoon.
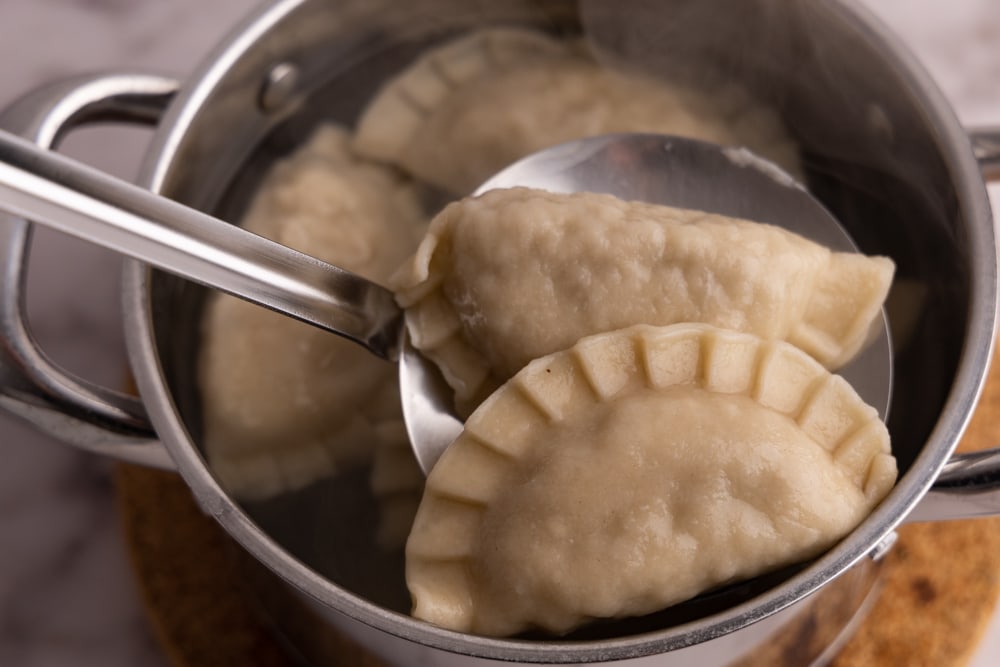
- Serve. Your pierogi are now ready to be served. Enjoy your homemade strawberry pierogi!

Recipe Tips
- Keep a bowl of water close by when you’re getting crafty with those pierogi, especially if you’re new to the game. Any flour lingering on the edges of the dough might prevent it from sealing properly. The solution? Wet your finger and lightly moisten the area that’ll be pinched together.
- Craving some variety? Think about splitting your strawberries into two squads – the little guys can go in the cooked filling and the larger ones get to start solo, snuggled up in the pierogi dough. If you decide to go this route, remember to adjust the sugar and cornstarch depending on the quantity of strawberries you use for the cooked sauce.
- A time-saving tip: start boiling the water halfway through preparing the pierogi. As soon as it starts to boil, drop in some pierogi and keep forming your little pockets while the first batch is cooking. This way, you’ll be making the most of your time.
Serving Suggestions
If you’re pondering over how to serve these strawberry pierogi, I’ve cooked up some tasty suggestions for you! Here they are:
- Just as they are. If you go with the cooked strawberry sauce filling, these babies are ready to rock right out of the pot. If you used whole strawberries, a little sprinkle of powdered sugar could be the magic touch.
- Pan-fried. Melt a bit of butter in a non-stick pan (swap in oil for a vegan spin) and give them a quick fry until they’re crispy on both sides. This little texture tweak can make a world of difference. Plus, you can mix and match this method with any of the topping options below.
- Sour cream. The zing of sour cream is a dream team with the sweet strawberry filling. Just plop a dollop on top of your pierogi and dig in. If you chose whole strawberries for the filling, a dusting of powdered sugar might be just the ticket.
- Melted butter. For a more indulgent twist, melt some butter and let it rain over your pierogi. This will amp up the richness of your dish. If you pan-fried yours, use the pan drippings.
- Strawberry sauce. To dial up the strawberry goodness, whip up a quick strawberry sauce. Blend a handful of fresh strawberries, mix in some sugar (to your liking), and a few dollops of thick yogurt (Greek yogurt or skyr are my go-tos). Drizzle this sauce over your pierogi for a fresh, fruity flavor boost.
- Ice Cream. Is there anything better than a scoop of vanilla ice cream paired with these pierogi on a sunny summer day?
If you’ve got other favorite ways to serve these, don’t forget to drop a comment below. And check out this article covering pierogi sauces and toppings for more inspiration.

Storage
Arrange the pierogi on plates without any overlap and let them cool off. This process allows the tops to dry out nicely. After about a quarter of an hour or so, flip ’em over and give the other side another 15-minute drying session.
This step ensures both sides dry properly, which is key in preventing the pierogi from sticking together and getting torn when stored.
Once they’re dry, transfer them to an airtight container. Aim to minimize the contact between them (yep, we’re still trying to avoid stickiness and tearing), keeping them in a single layer. If you need to stack them, remember to put a barrier of plastic wrap or aluminum foil between the layers.
Stored like this, they’ll stay fresh for 3 to 4 days in the fridge. If looking at a longer timeline, you can freeze the extra pierogi.
How to Reheat
To reheat your delicious Strawberry Pierogi, the quickest and easiest way is to pan-fry them. Here’s how:
- Grab a non-stick pan or skillet and heat it over medium-high heat.
- Add a knob of butter to the pan and wait for it to melt and the pan to get nice and hot.
- Add the pierogi in a single layer and cook them for 4-6 minutes or until the bottom side is crisp and golden.
- Flip the pierogi and cook for another 4-6 minutes, until the other side is crisped up.
- Once both sides are nicely browned, they are ready to be served!
If you’re busy doing other stuff around the house (who isn’t?), you can simply melt the butter, add the pierogi, cover the pan with a lid, and leave them on low heat.
This way, they’ll take up to 15 minutes to fully reheat, but it’s a relatively hands-off process. Plus, it’s difficult to burn them this way. Just give the pan a shake whenever you can to prevent sticking.
After about 10 minutes, flip the pierogi over and cook for another 5 to 10 minutes.

This post may contain affiliate links. Read our privacy policy.
Equipment
Ingredients
Pierogi Dough
- 2 cups all-purpose flour ~250g
- ¼ tsp salt
- 1 ½ tbsp oil
- ½ cup boiling water ~120ml
Strawberry Pierogi Filling
- 1 Pierogi dough
- 21 oz strawberries ~600g, fresh or frozen
- 3 ¼ tbsp sugar ~40g
- 2 tablespoons cornstarch
- lemon juice optional
Instructions
Make Dough
- Boil Water: Boil a pot of water.½ cup boiling water
- Sift Flour: Sift flour into a large bowl.2 cups all-purpose flour
- Add Salt: Add salt and mix.¼ tsp salt
- Wet Ingredients: Add oil and boiled water.1 ½ tbsp oil
- Mix Ingredients: Mix the ingredients by stirring with a spoon. Be careful not to burn yourself. Once there is no visible water in the bowl, use your hands to knead the dough until it is a homogeneous ball.
- Wrap and Rest: Wrap the dough ball tightly in plastic wrap and let it rest for about 30 minutes before continuing.
- Make Pierogi: Once the wait is over, the dough is ready for rolling and making pierogi.
Prep Filling
- Choose Filling: Select your filling. Either use whole strawberries, a cooked strawberry sauce, or both. Defrost if using frozen strawberries.
- Preparation: Wash and dry fresh strawberries.
- For Cooked Strawberries Filling: Chop strawberries, mix with sugar and cornstarch, and set aside for 10-15 minutes. Cook on low heat until it thickens, then let cool and refrigerate if not using immediately.21 oz strawberries, 3 ¼ tbsp sugar, lemon juice, 2 tablespoons cornstarch
Combine
- Prepare Dough: After resting, divide the dough into 2 or 3 parts and roll it out to a thickness that won't tear easily.1 Pierogi dough
- Cut Dough: Use a glass or sharp-lipped jar. Reuse remaining dough for more pierogi.
Whole Strawberries Filling
- Stretch: Stretch dough circles into an oblong shape.
- Fill Pierogi: Place a strawberry in the center and fold the dough around it.
- Pinch and Seal: Pinch the dough to form a pocket, adding extra strawberry pieces if necessary.
Cooked Strawberries Filling
- Fill Pierogi: Cup the dough circle in your hand and add a teaspoon of the filling.
- Seal: Fold and seal the dough, then seal the upper half while gently shaking to settle the filling.
- Transfer: Transfer completed pierogi to a well-floured surface and cover with a damp towel. Repeat steps until dough or filling is used up.
Cook
- Cook: Boil salted water (I recommend 1 tsp salt per 1 quart water). Once boiling, add the pierogi and stir. Simmer pierogi until they float, then allow an extra 1-2 minutes before transferring to a plate.
- Serve: Serve and enjoy your homemade strawberry pierogi!
Hungry for More?
Check out these pierogi recipes next:
- Blueberry pierogi recipe. Got some fresh or frozen blueberries? Great, now turn them into pierogi.
- Apple pierogi recipe. Got a bunch of apples sitting around? These are simple to make and taste exquisite.
- Farmer’s cheese pierogi recipe. Farmer’s cheese pierogi are one of the simplest sweet pierogi to make. If your local grocery store sells farmer’s cheese, grab a container or two and check these out.
- Plum dumplings. Love plums? You’ll love these.
- Pierogi fillings. Here’s our guide to all things related to pierogi fillings, including a number of options for you to test.